Ming-Image-0.1-Design is an open image model from inclusionAI that is built for design work. In simple words, we describe a poster, an app screen or a slide, and it draws it, text and all.
What if we told you one gaming GPU can turn out a finished poster, a full comic page, or a new version of your own photo in seconds? We ran it on one RTX 5090 and made 16 designs, four 8-panel comics and seven photo edits. Most images took about 8 seconds.
But here's the real mystery. The model card says it needs an 80 GB GPU, and our card has only 32 GB. The answer is hiding in the parts nobody counts.
In this blog, we will first see what it made. Then we will open up the checkpoint and see how we fit it on the card by converting it to FP8 ourselves.
What Can It Design?
We asked for 16 very different designs. Some are for business, some are for learning, and some are just for fun.

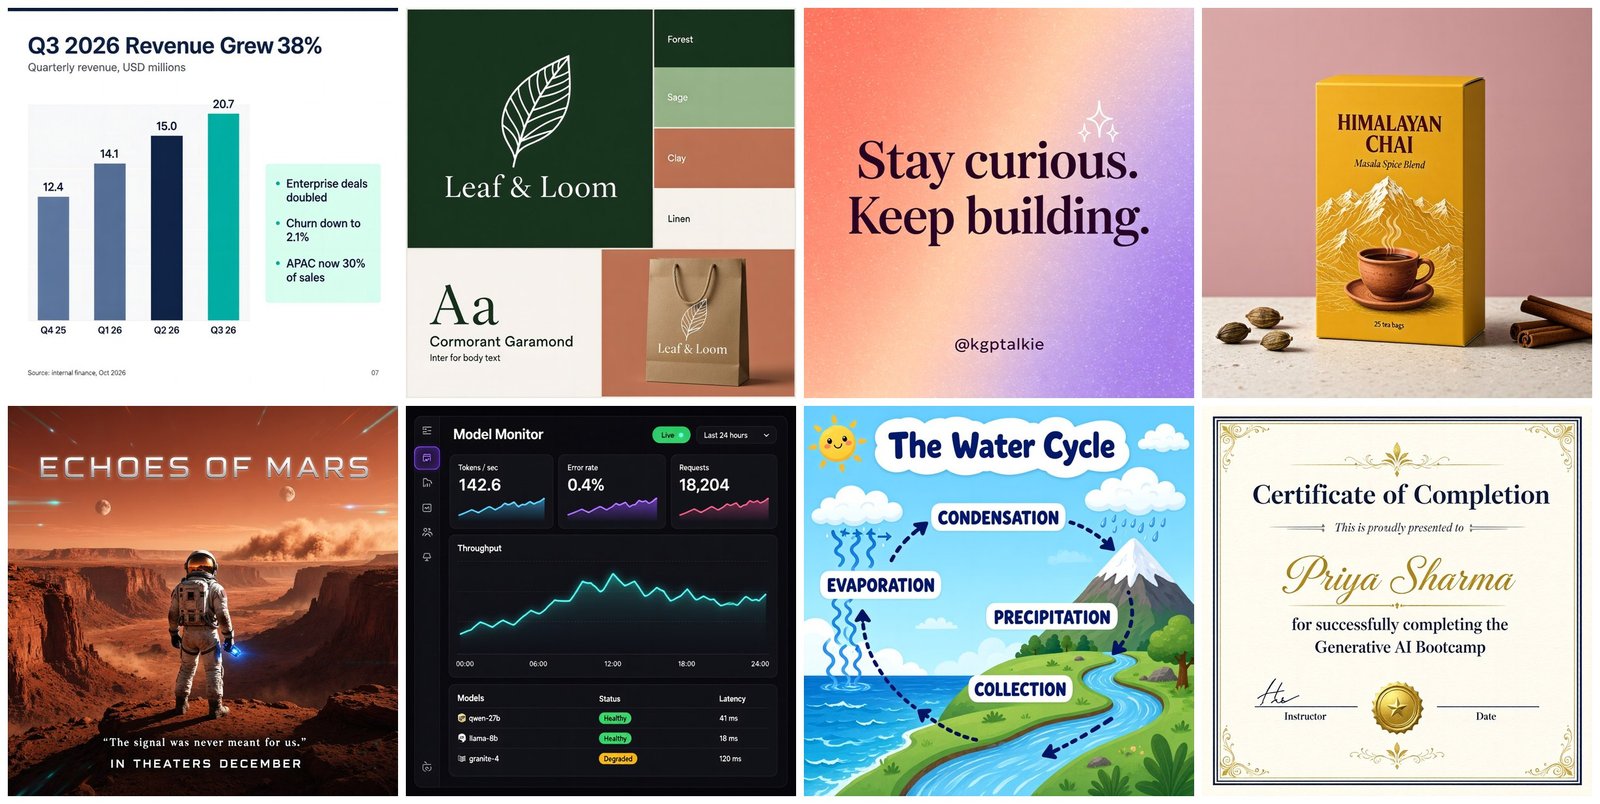
This is where the model shines. It lays out a page like a designer does. Headlines are big, buttons line up, and every price on the menu sits at the end of its dotted line.
The text is the real win. The thumbnail says exactly "RUN AI LOCALLY". The slide shows the four bar values we asked for: 12.4, 14.1, 15.0 and 20.7. The menu lists six items with the right prices. The numbers inside these images are design content from our prompts, not measurements.
How Fast Is It?
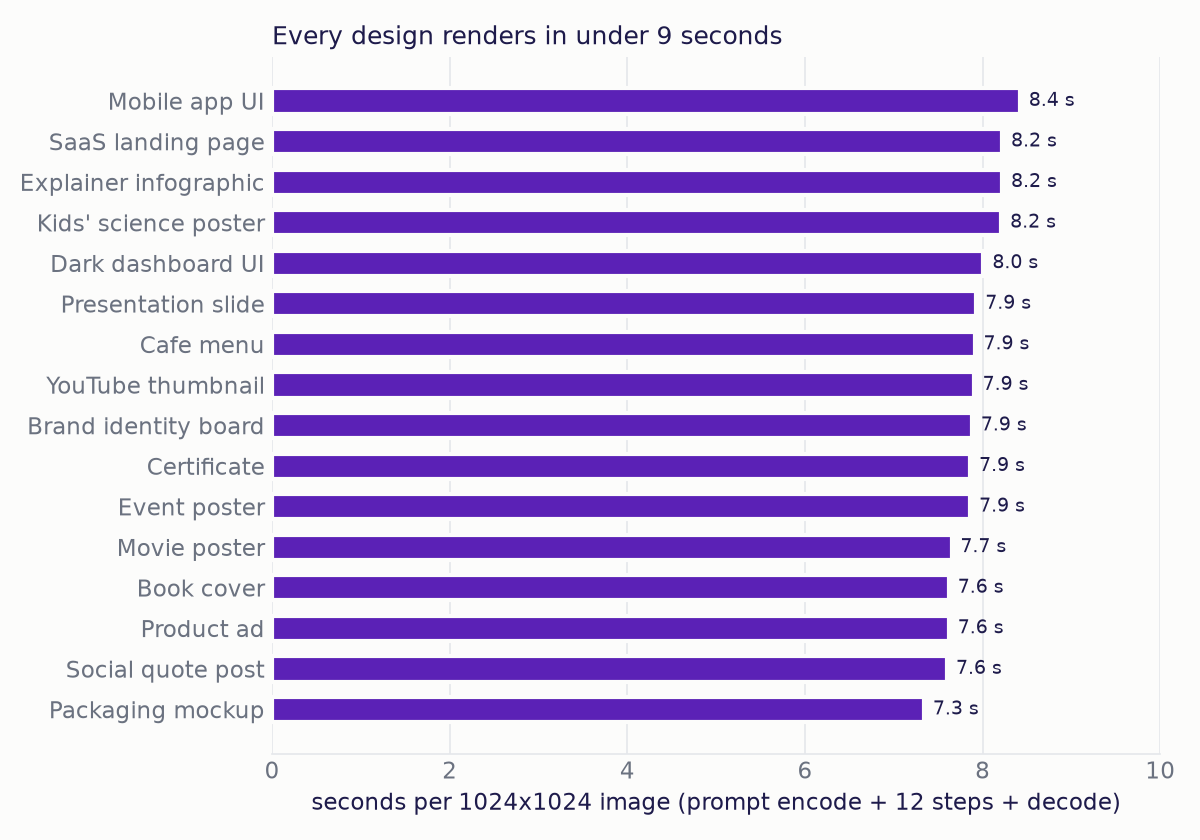
Every design took between 7.34 and 8.42 seconds, with a median of 7.89 seconds. That time includes reading the prompt, the 12 drawing steps, and turning the result into pixels.
Can It Tell a Story in Comics?
Next, we made four comics. Each one has eight separate images, laid out in two rows of four. The model has no memory between images. So, how do we keep a character looking the same?
We repeat the same description, word for word, in all eight prompts. We also keep the same style sentence and the same seed. Each panel ends with a short caption.
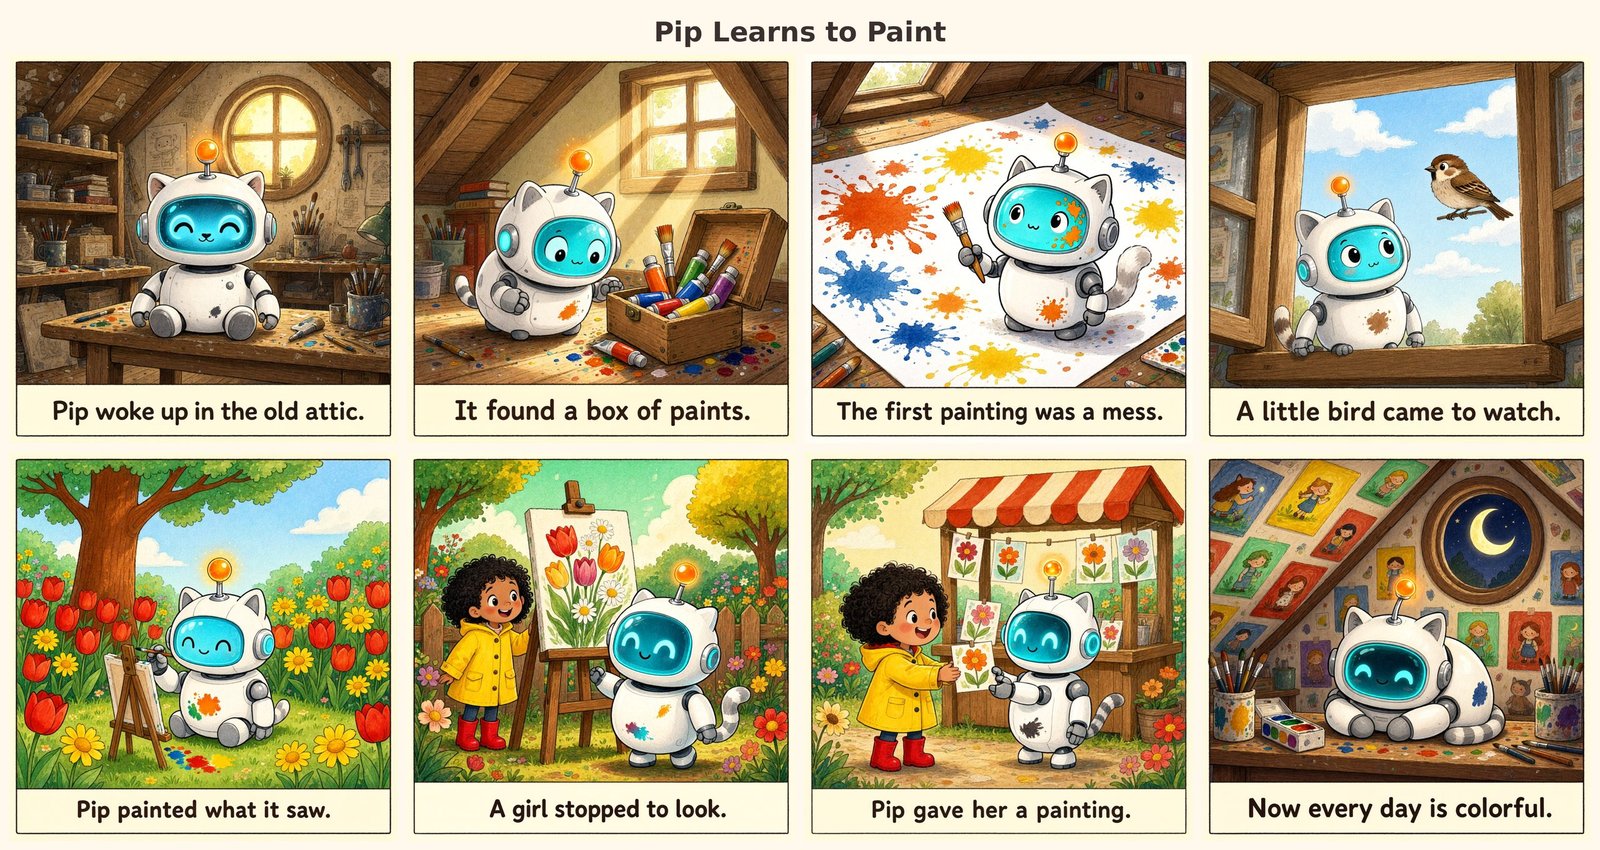
In "Pip Learns to Paint", the little robot looks the same in every panel. We described Pip as "the size of a cat", and the model gave Pip cat ears and a tail. But it did so in all eight panels, so it simply became the design.
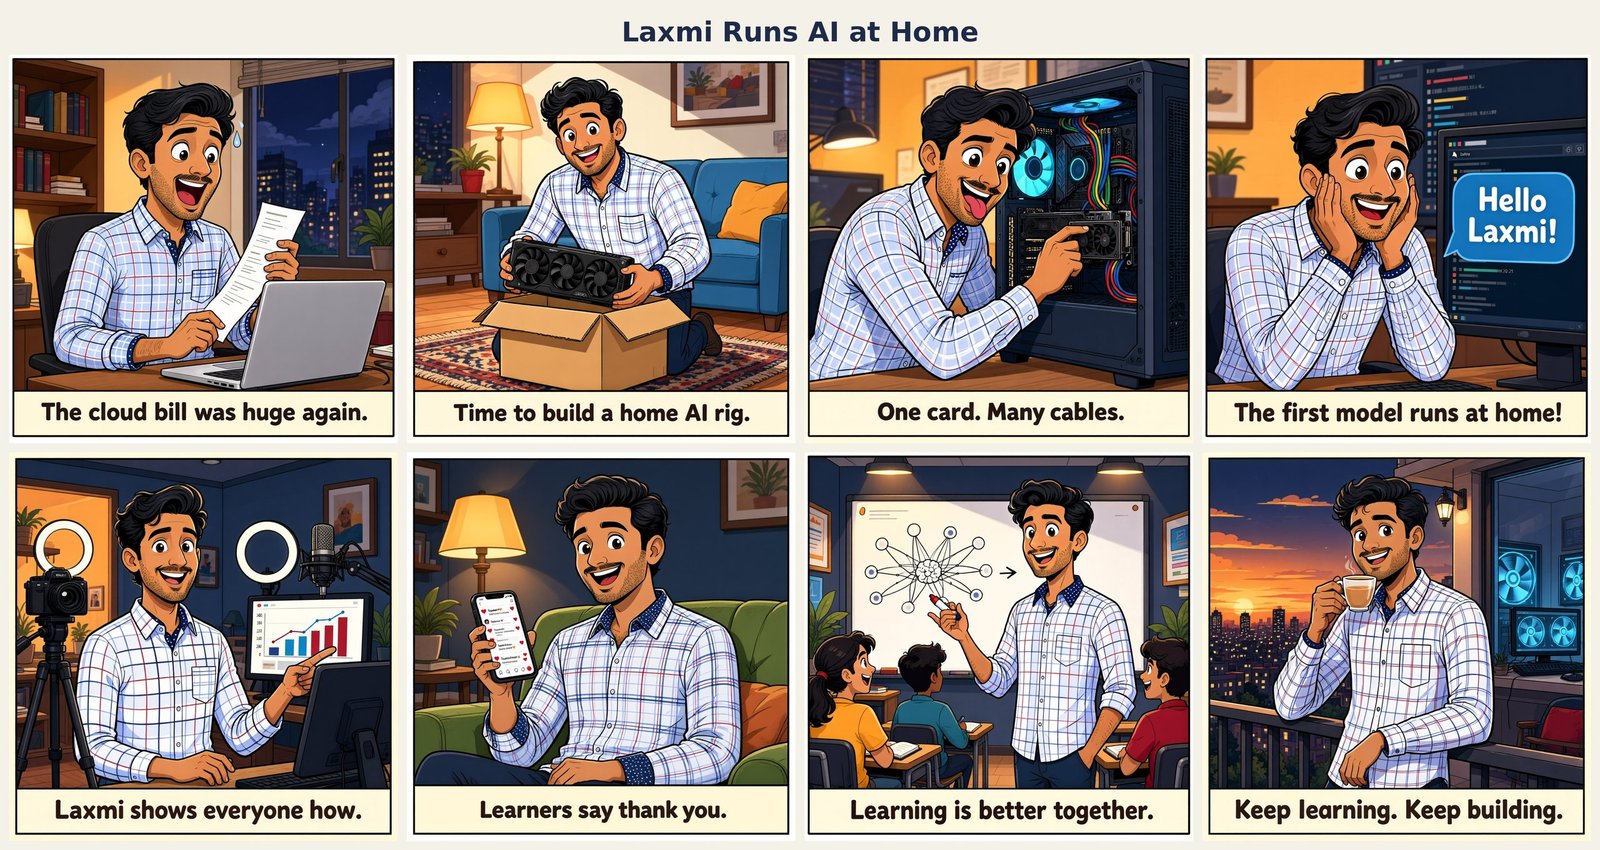
The second comic stars a cartoon of the author, made from a real photo. We will see how that cartoon was made in the next section. The hair, the stubble, the plaid shirt and the dotted collar stay the same in all eight panels.
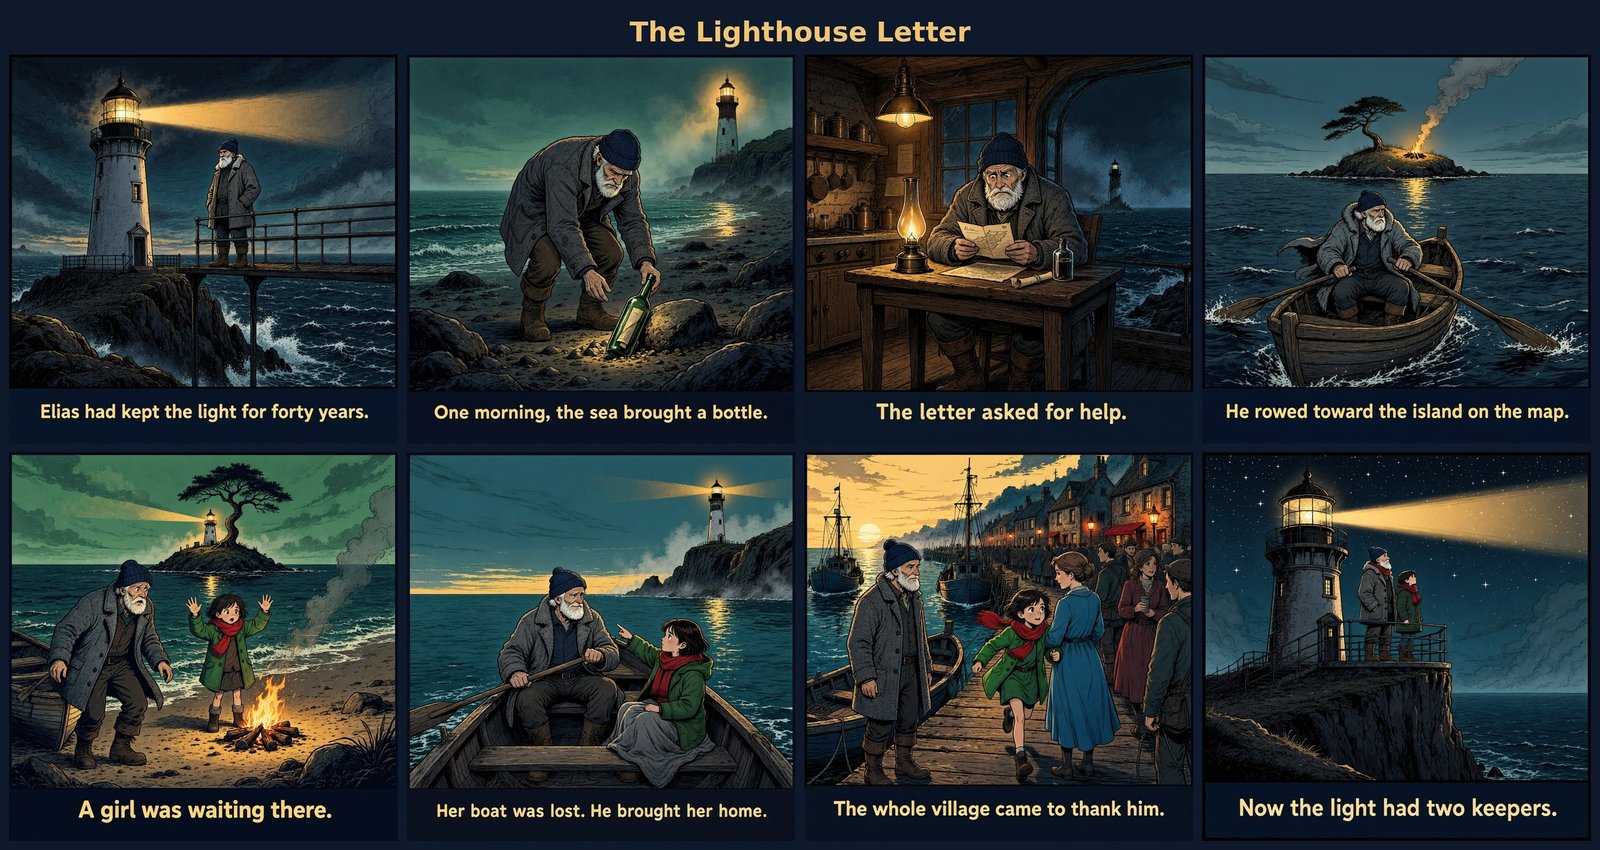
"The Lighthouse Letter" has two characters, an old keeper and a young girl. Both keep their clothes and faces from panel to panel.
The last comic is different. It is a science lesson, so every drawing also had to be correct physics.
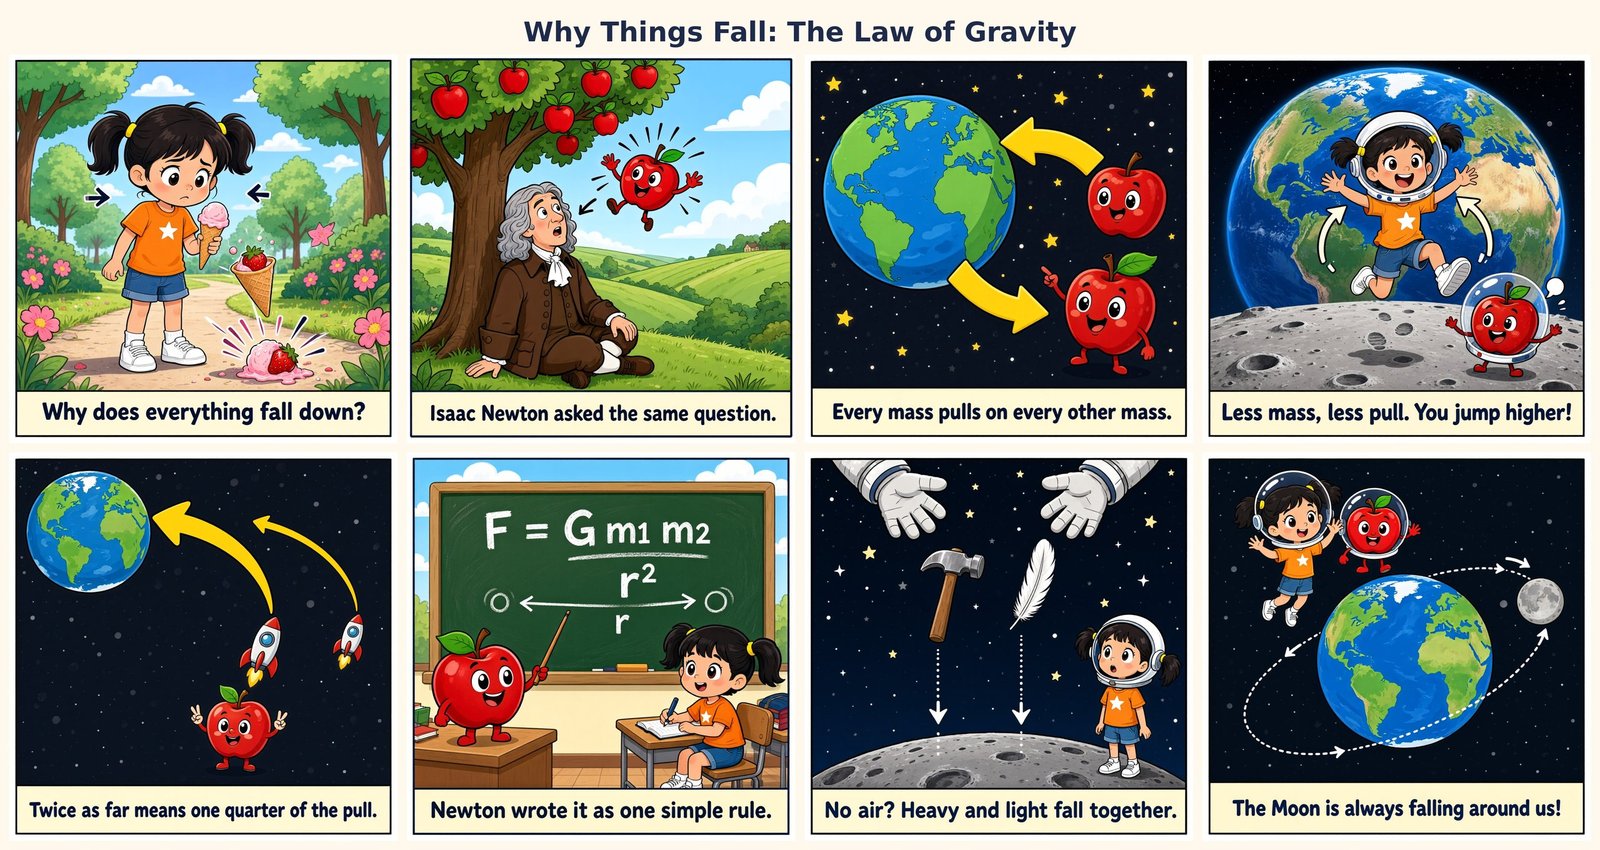
Let me tabulate what each panel teaches:
| Panel | Caption | The physics |
|---|---|---|
| 1 | Why does everything fall down? | The question |
| 2 | Isaac Newton asked the same question. | The famous falling apple story |
| 3 | Every mass pulls on every other mass. | The pull works both ways: Earth pulls the apple, and the apple pulls Earth |
| 4 | Less mass, less pull. You jump higher! | Gravity on the Moon is about one sixth of Earth's |
| 5 | Twice as far means one quarter of the pull. | The inverse-square law |
| 6 | Newton wrote it as one simple rule. | F = G m1 m2 / r² |
| 7 | No air? Heavy and light fall together. | A hammer and a feather dropped on the Moon (Apollo 15, 1971) |
| 8 | The Moon is always falling around us! | An orbit is falling around something, forever |
The model drew the formula correctly as a fraction on its first try. One weak spot remains in panel 5. The far rocket's arrow is only a little thinner than the near one, so the caption does most of the teaching there.
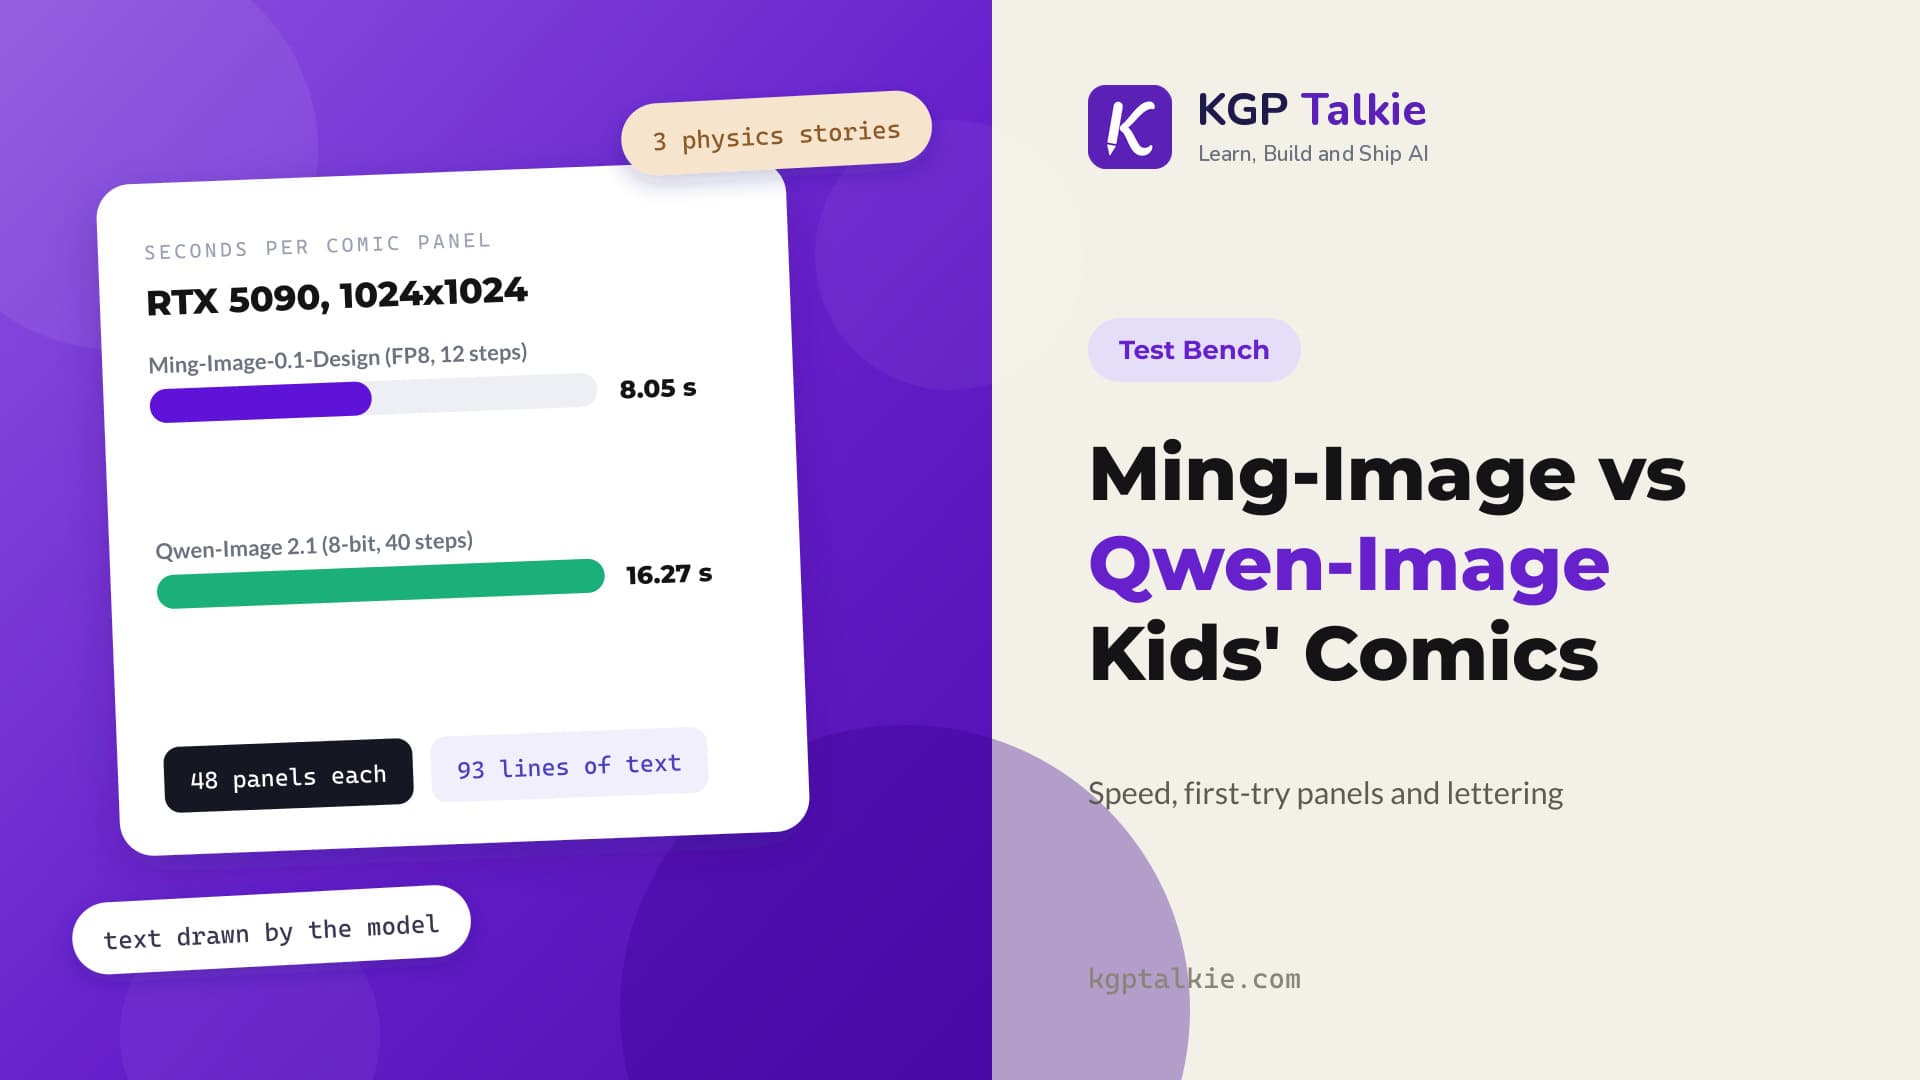
Each comic panel took 7.67 to 8.61 seconds. So, a whole 8-panel page takes about a minute.
Can It Edit a Real Photo?
Yes. The same model has an edit mode. We give it a photo and a plain sentence, like "Change the background to a modern podcast studio". It keeps the rest of the photo as it is.
We used a photo of the author and tried seven edits:
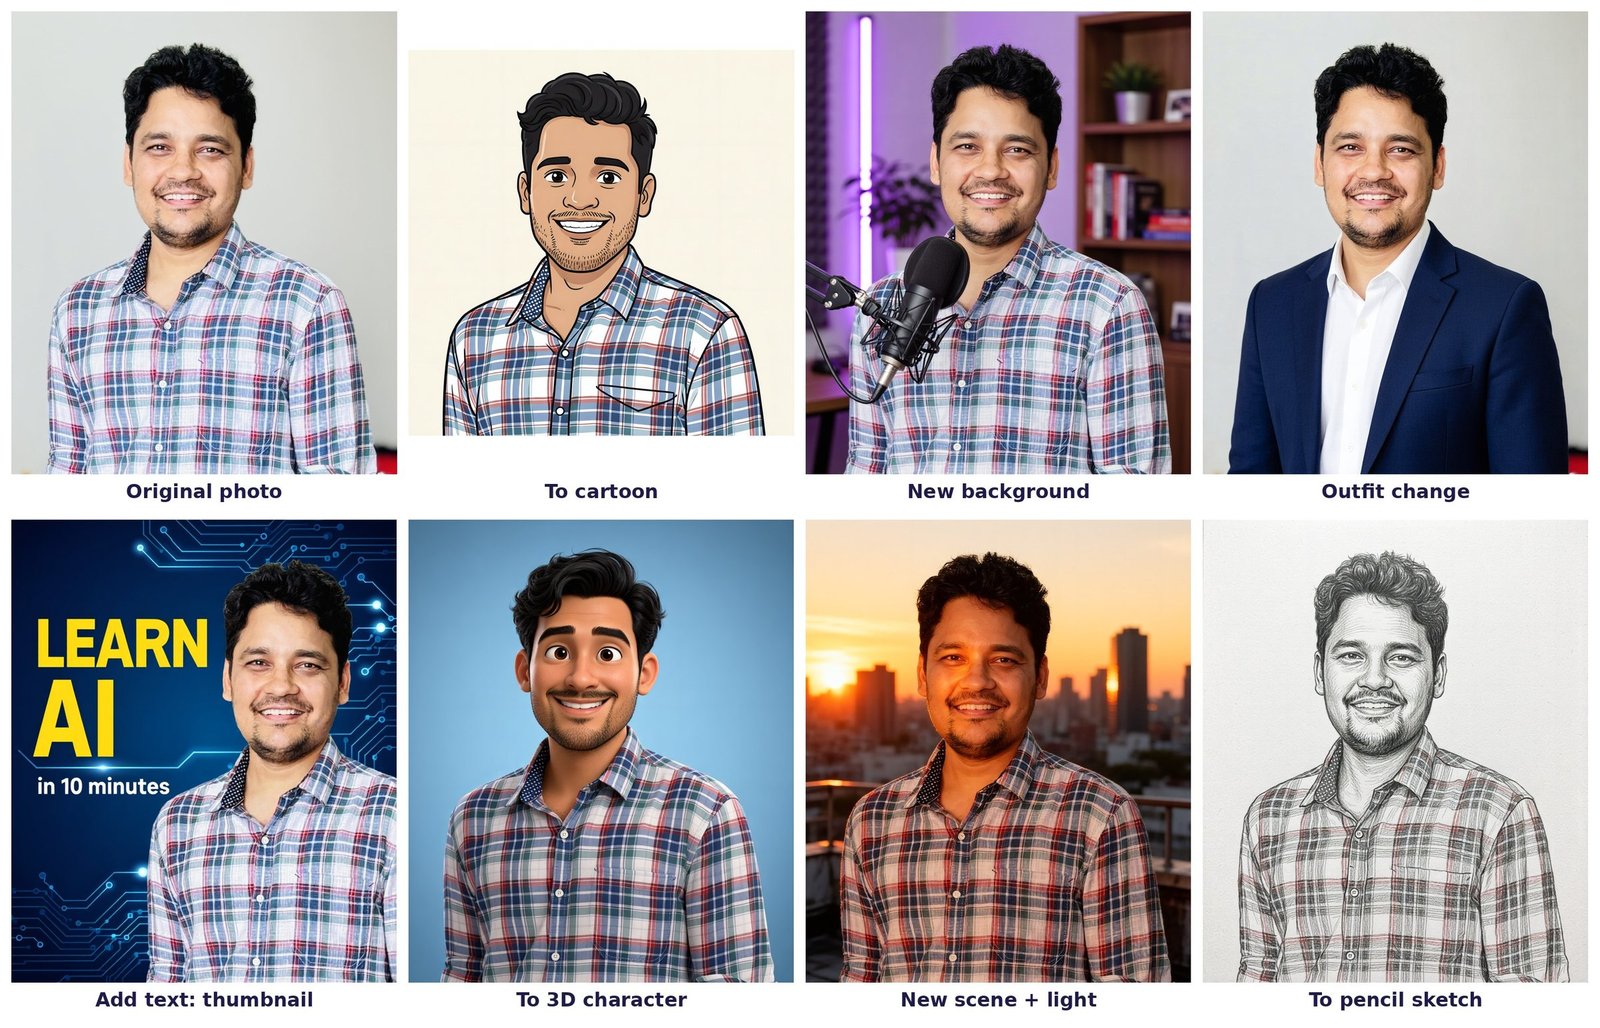
| Edit | What it tests | Result |
|---|---|---|
| Podcast studio | New background, same person | Face, smile and shirt unchanged |
| Navy blazer | Change only the clothes | Shirt swapped, everything else kept |
| YouTube thumbnail | Write text on a photo | "LEARN AI" and "in 10 minutes" spelled exactly |
| Rooftop at sunset | New scene and new light | Warm light on the face, city behind |
| Pencil sketch | Change the style | The same face, with pencil shading |
| Cartoon | Change the style | The same look after one prompt fix |
| 3D character | Change the style | The same look after the same fix |
The four realistic edits kept the face closest. The three style changes keep the hair, the shirt and the smile, but they simplify the face, as any style change does. We judged the likeness by eye.
Each edit took 14.58 to 17.39 seconds. That is about twice the time of a normal image, because the photo becomes extra input for the model.
Now, the cartoon from this set is the hero of the second comic. Our first plan was to use edit mode for every comic panel, with the cartoon as the input. That did not work. The model kept the cartoon portrait in place and added a second copy of the character acting out the scene. We tried a stronger instruction, and it drew two copies again.
In simple words, edit mode keeps the subject where it is. It cannot walk a character into a new scene. So, the comic panels use a written description of the cartoon instead. That is looser than a true copy (the shirt came out paler), but it stays the same from panel to panel.
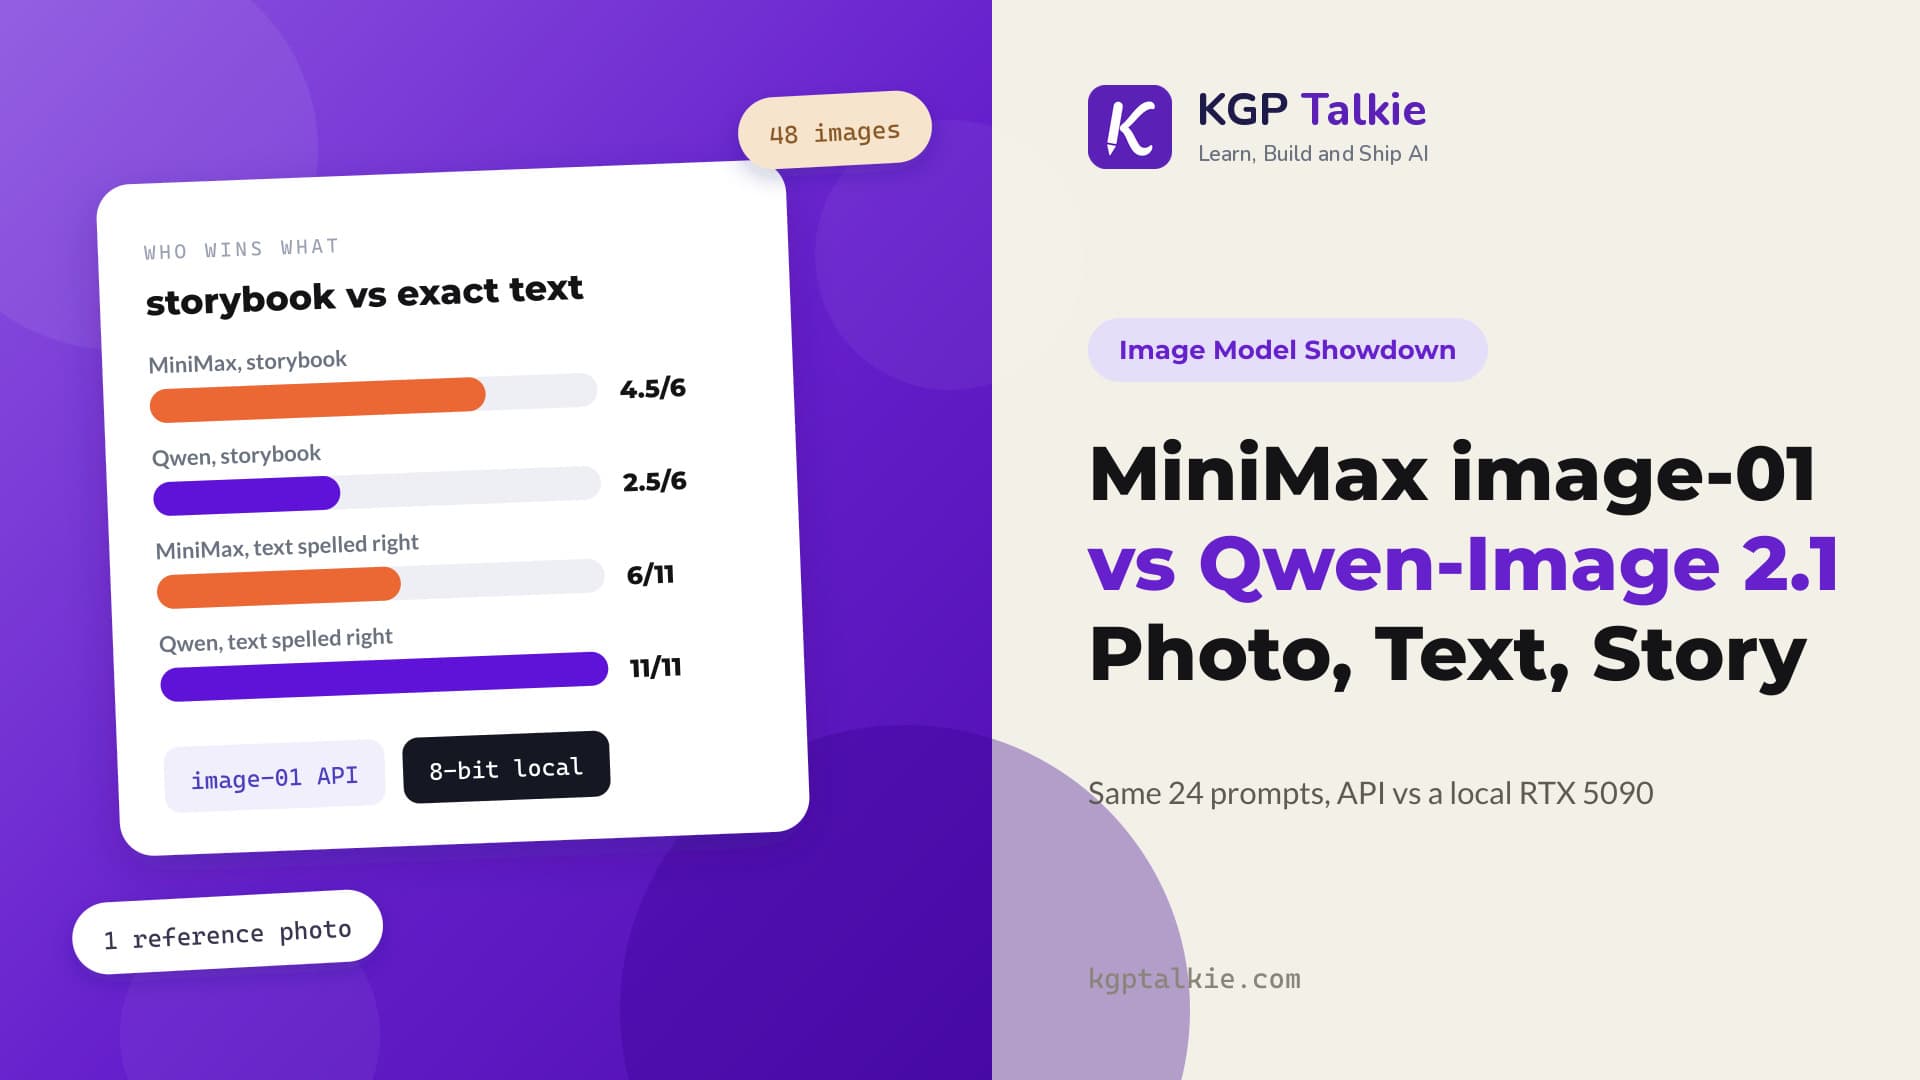
Our MiniMax vs Qwen-Image 2.1 post saw the same thing with Qwen: it pasted its reference character into every page. Here, Ming-Image's edit mode also keeps the reference in place.
What Is Inside Ming-Image-0.1-Design?
Now, let's see how all of this ran on a 32 GB card. The "6B" is only one part of the model. That part is the diffusion transformer, the piece that draws the picture. Before it can draw, a language model has to read our prompt. Let me tabulate the parts for your better understanding. We counted every tensor in the checkpoint files:
| Part | What it does | Parameters | Size in bf16 |
|---|---|---|---|
Language model (mllm/) |
A Ling mixture-of-experts model plus a small vision model. It reads the prompt once. | 17.0B | 31.67 GB |
Connector (connector/) |
A Qwen2 1.5B model that turns the prompt's meaning into drawing instructions | 1.5B | 2.88 GB |
Diffusion transformer (transformer/) |
The 6B part that draws the image in 12 steps | 6.2B | 11.46 GB |
| VAE and small helpers | Turn the result into pixels, with a see-through (alpha) channel | 0.2B | 0.30 GB |
| Total | 24.9B | 46.3 GB |
Here, we can see the surprise. The drawing part is only a quarter of the model. The language model that reads the prompt is almost three times bigger. In total, the model needs 46.3 GB of memory, while our card has 32 GB.
How Did We Fit It on a 32 GB Card?
When we loaded it, Windows and background apps already held 2.97 GB of the card. That left 28.87 GB free. 46.3 GB does not fit in 28.87 GB.
So, here comes FP8 to the rescue. FP8 stores each weight in 8 bits instead of 16. In simple words, every big table of numbers in the model takes half the space. The math still runs in 16 bits: each table is expanded back just before it is used.
We did the conversion ourselves while the model loads. We did not use a ready-made quantized download.
We chose what to convert on purpose:
- Converted to FP8: every large layer in the language model, the connector and the diffusion transformer. That is 15,234 layers in total.
- Kept in 16 bits: the small layers that tell the diffusion transformer how far along the drawing is. They are the most sensitive part. We also kept the normalization layers, the expert routers, the VAE, and a few small helpers.
- Left out: two parts the model never uses when it makes images. They are the language model's output layer and the connector's word table. That saved another 1.04 GB.
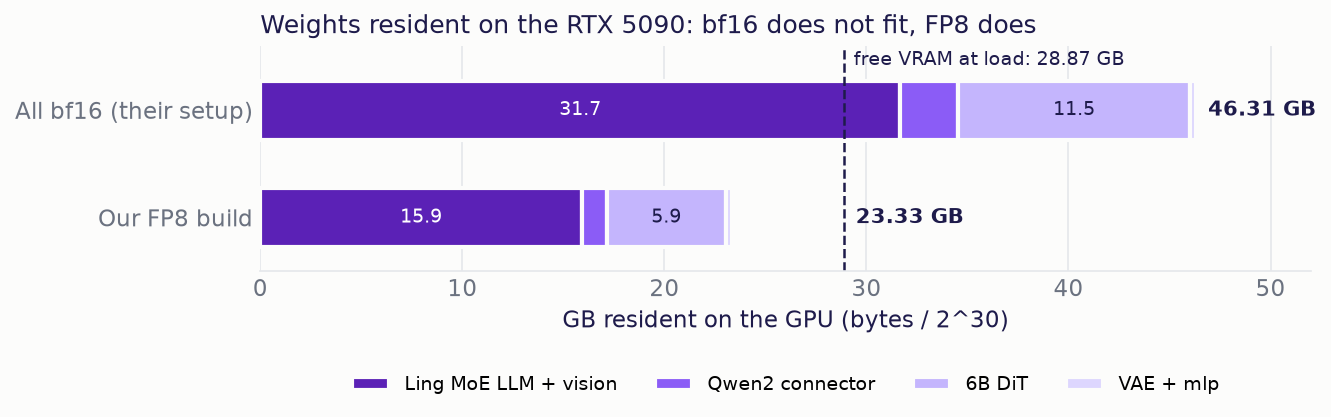
It worked. The whole model now sits on the GPU in one go. Let me tabulate what we measured:
| Measurement | Result |
|---|---|
| Memory used after loading | 23.30 GB |
| Highest memory during a normal image | 24.03 GB |
| Highest memory during a photo edit | 24.42 GB |
| Loading time | 29.3 s |
| Error from the FP8 conversion | 2.6% on average per layer |
On Windows, a card that runs out of memory does not always crash. It can quietly borrow system RAM and slow down. We tracked that on every image, and it never happened.
Does FP8 Change the Pictures?
A smaller model is only useful if it still draws well. So, we ran six prompts through the full 16-bit model as well. To make that fit, we moved the language model to the CPU for this test only.
The pictures came out a little different, but not worse. The same seed took a slightly different path, so layouts shifted a bit. On a water cycle poster, both versions drew the same scene with all four labels spelled right.
The spelling mistakes were not caused by FP8 either. On one infographic, the 16-bit model wrote "Augmensted" instead of "Augmented" and printed "to" twice. Our FP8 version wrote "Augmeneted" and did not repeat anything. So, these small text slips come from the model itself.
Can It Make Transparent Images?
The model card gives fixed phrases for a see-through background, such as "RGBA, 4-channel, transparent background". The phrase goes at the very start of the prompt. We measured how much of each image came out fully transparent:
| Subject | Transparent pixels |
|---|---|
| Tabby cat, photo style | 68.7% |
| Silver sedan, photo style | 35.4% |
| Golden retriever, photo style | 0.0% |
| Potted plant, photo style | 0.0% |
| Graphics card, photo style | 0.0% |
| Person with a laptop, photo style | 0.0% |
| Robot mascot, cartoon or 3D (11 tries) | 0.0% |
Here, we can see that only the cat and the car worked. Both are subjects from the model card's own showcase. Everything else came back with a solid background. The full 16-bit model failed in the same way, so this is not FP8's fault. We only tested at 1024x1024, and the card recommends 2048x2048 for these images.
What Went Wrong at First?
Not every image was right on the first try. Across the 17 designs we tried, 7 were right straight away and 10 needed a prompt fix. We kept the same seed and changed only the words. The comics and the photo edits followed the same pattern.
All of these were fixed by rewriting the prompt. One idea could not be fixed that way: a transparent cartoon sticker.
The seven patterns below are what we learned:
- Long or rare words at a small size get misspelled. "Retrieval-Augmented" failed three times. A short, simple subtitle worked.
- Tiny text inside a mockup turns into gibberish. Describe that area as shapes, with only one or two real labels.
- Never tell it to leave out a brand logo. Our "no logo" sneaker came out with a famous logo on it. Describe the shoe's own design instead.
- Hex color codes written as text came out wrong. Color names worked.
- Put each piece of text in one place. A quote split across two strings printed one line twice.
- Watch the size words in a character description. "The size of a cat" gave a robot cat ears, and "the size of a football" gave an apple football stitching.
- Check the physics in a science comic. One panel first drew the gravity arrow pointing away from Earth, and another dropped the hammer and the feather at different heights.
Limitations
- We made one image per prompt, with one seed and one size (1024x1024). We did not test the 2048x2048 size the card recommends.
- We judged quality by eye. The FP8 vs 16-bit check covers six prompts.
- We wrote every prompt by hand in the model's layer-by-layer JSON format. We did not run the official prompt-rewriting models, so the full official pipeline may do better.
- We tested photo editing on one photo with seven instructions.
- We checked the physics in the gravity comic ourselves. The model does not check it.
- We did not test the separate Ming-Image-0.1-Design-Layer model, which splits a design into editable layers.
Conclusion
Ming-Image-0.1-Design runs on one 32 GB RTX 5090 once we store it in FP8. It uses 23.30 GB, never spills into system memory, and draws a 1024x1024 design in about 8 seconds. It is very good at the job its name promises: clean layouts and exact short text on posters, app screens, slides, menus and covers. It also draws steady characters across a comic, and it edits a real photo without losing the face.
This is how Ming-Image-0.1-Design works on a home GPU. We started with what it made: 16 designs, four comics, and seven photo edits. Then we opened the checkpoint, found that its "6B" is really 24.9B parameters, and made it fit with our own FP8 conversion. Finally, we saw where it breaks: rare words, tiny text, transparent backgrounds, and moving a reference character into a new scene.
Note
How we kept the numbers clean. We tracked Windows' shared-memory counter on every image, and nothing spilled into system RAM. Every image used seed 42, 12 steps, CFG 1.0 and 1024x1024. The FP8 conversion is weight-only, with one scale per output channel and 16-bit math. The official code needed three small changes for Windows. We used a newer PyTorch for the RTX 5090. We added a small stand-in for NVIDIA's transformer-engine, since only its RMSNorm is used. And we used eager attention in place of FlashAttention 2. Software: torch 2.11.0+cu128, transformers 4.57.1 and diffusers 0.36.0.