In the previous lesson, we ran the tool calling loop by hand. We built the [HumanMessage → AIMessage → ToolMessage → AIMessage] sequence ourselves, we detected the tool call ourselves, and we injected the result ourselves. It worked, but we were the glue holding every step together.
So, here comes the agent to the rescue. We call agent.invoke({"messages": question}) once, and the agent handles the reasoning, the tool dispatch, the result injection, and the final answer on its own. Under the hood, a LangChain v1 agent is a compiled LangGraph StateGraph: a small state machine where the model node thinks, the tool node acts, and the loop repeats until the answer is ready.
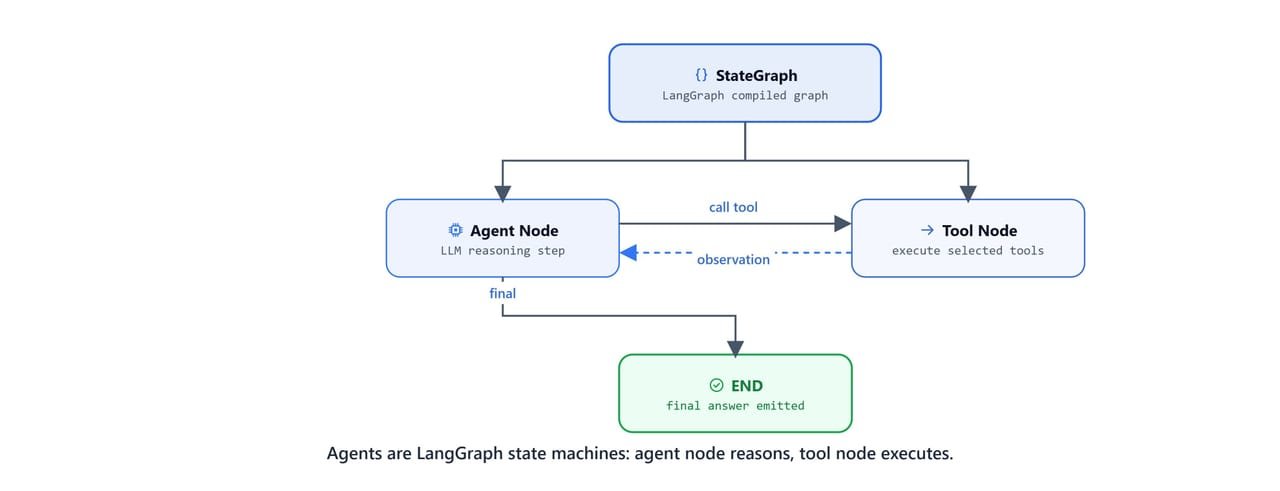
Agents are LangGraph state machines: the agent node reasons, the tool node executes, and the loop repeats.
Prerequisites: langchain, langchain-community, langchain-core, langgraph, ddgs, python-dotenv installed. Ollama running with qwen3 and llama3.2 (or gemma3) pulled.
pip install -U langchain langchain-community langchain-core langgraph
pip install -U ddgs python-dotenv
ollama pull qwen3
ollama pull gemma3How Do We Build a Web Search Tool?
An agent without tools is just a chatbot. So, before we create any agent, we will build a real web search tool backed by DuckDuckGo through the ddgs library.
One decision first. We keep this tool in its own file called tools.py, not inside the notebook. Why? Because a tool is something we will reuse across many lessons and many agents. When it lives in its own module, any notebook can simply run import tools and use it, without defining the tool again. Tool definitions stay in one place, and agent logic stays in another.
Let's see the code as below:
# tools.py
from dotenv import load_dotenv
load_dotenv()

from langchain_core.tools import tool
from ddgs import DDGS

@tool
def web_search(query: str, num_results: int = 10) -> str:
    """Search the web using DuckDuckGo.

    Args:
        query: Search query string
        num_results: Number of results to return (default: 10)

    Returns:
        Formatted search results with titles, descriptions, and URLs
    """
    try:
        results = list(DDGS().text(
            query=query,
            max_results=num_results,
            region="us-en",
            timelimit="d",
            backend="google, bing, brave, yahoo, wikipedia, duckduckgo"
        ))

        if not results:
            return f"No results found for '{query}'"

        formatted_results = [f"Search Results for '{query}':\n"]
        for i, result in enumerate(results, 1):
            title = result.get('title', 'No title')
            body = result.get('body', 'No description available')
            href = result.get('href', '')
            formatted_results.append(f"{i}. **{title}**\n   {body}\n   {href}")

        return "\n\n".join(formatted_results)

    except Exception as e:
        return f"Search error: {str(e)}"
Here, we have created our web_search tool. Let me explain each part and why it is written this way.
load_dotenv()loads settings from a.envfile before anything else runs. Our tool needs no API key today, but keeping this line makes the module ready for tools that do.- The
@tooldecorator turns our plain Python function into a LangChain tool. It reads the function name, the arguments, and the docstring, and packages them into a description the LLM can understand. - The docstring is not a comment here. The LLM reads it to decide when to use this tool and what to pass. A vague docstring produces a misused tool, so we describe the job, each argument, and the return value clearly.
DDGS().text(...)performs the actual search. Thebackendlist letsddgspull results from several engines, andtimelimit="d"keeps results from the last day, which is exactly what we want for fresh news and weather questions.- The
if not resultscheck matters because a search can succeed and still find nothing. We return a clear message instead of empty text, so the LLM knows the search came back empty and can say so honestly. - We use
result.get('title', 'No title')instead ofresult['title']because a result may be missing a field. With.get()and a default value, the tool keeps working instead of crashing. - The
exceptblock returns the error as text instead of raising it. Why? Because the error then flows back to the LLM as a tool result, and the LLM can react to it, maybe by retrying with a different query. A crashed tool kills the agent, but a tool that reports its failure keeps the agent alive.
Now, let's test the tool on its own, because we should always test a tool directly before handing it to an agent. Notice that we call .invoke() with a dictionary instead of calling the function normally. The @tool decorator wrapped our function into a LangChain tool object, and .invoke() is the standard way to run any LangChain component:
import tools

print(tools.web_search.invoke({"query": "What is Langchain?", "num_results": 1}))Search Results for 'What is Langchain?':
1. **What is Langchain? - Analytics Vidhya**
This is where LangChain comes into play, a powerful open-source Python framework designed to simplify the development of LLM-powered applications.
https://www.analyticsvidhya.com/blog/2024/06/langchain-guide/It works. The tool searches the real web and returns clean, numbered text with titles, descriptions, and links. This formatting matters because the reader of this output is the LLM, and clean input produces clean answers.
How Do We Create an Agent?
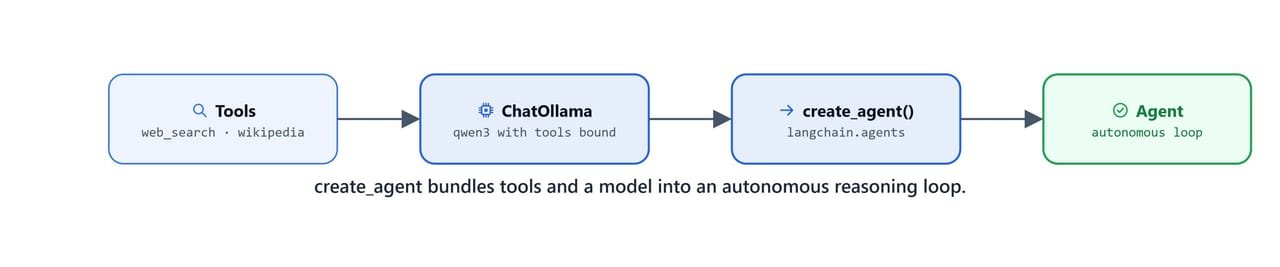
create_agent bundles your tools and a model into one autonomous reasoning loop.
Model Parameters
The agent is only as good as its brain, the model. ChatOllama lets us set every important knob explicitly, and each knob controls a different part of the model's behaviour. In simple words, temperature decides how adventurous the model is, num_predict decides how long it may speak, num_ctx decides how much it can hold in one go, and repeat_penalty stops it from going in circles.
| Parameter | Description |
|---|---|
temperature |
Randomness (0.0 = deterministic, 1.0 = very creative) |
num_predict |
Maximum tokens to generate (equivalent to max_tokens) |
top_k |
Number of highest-probability tokens to consider at each step |
top_p |
Cumulative probability threshold for nucleus sampling |
repeat_penalty |
Penalty multiplier for repeating tokens |
num_ctx |
Context window size in tokens |
reasoning |
Enable chain-of-thought reasoning (Qwen3 specific) |
Your First Agent
To create an agent, we need exactly three ingredients: a model to act as the brain, a list of tools the agent may use, and a system prompt that sets its behaviour. Let's see the code as below:
from langchain_ollama import ChatOllama
from langchain.agents import create_agent
import tools

system_prompt = """You are a helpful AI assistant.
Use the available tools when needed to answer questions accurately.
If you need to search for information, use the web_search tool.
Always provide clear and concise answers.
"""

model = ChatOllama(model="qwen3", base_url="http://localhost:11434")

agent = create_agent(model=model, tools=[tools.web_search], system_prompt=system_prompt)
Here, we have created our first agent. Let me explain each part.
ChatOllama(model="qwen3", base_url="http://localhost:11434")connects to theqwen3model that Ollama serves on our own machine at port11434. There is no API key anywhere, because everything runs locally.- The
system_promptdoes more than set a role. The line aboutweb_searchnudges the model to actually reach for the tool instead of guessing from its training data. Small nudges like this make an agent noticeably more reliable. create_agentbundles the model, the tools, and the prompt into one autonomous agent. Notice thattoolstakes a list. We pass one tool today, but we can pass many, and the model picks the right one for each job based on their docstrings. This is exactly why we wrote that docstring so carefully.
create_agent returns a compiled LangGraph StateGraph. It automatically manages the message loop: it calls the model, detects tool calls, executes them, and continues until the model produces a final answer with no pending tool calls. In simple words, the loop we ran by hand in the previous lesson now runs itself.
Invoking the Agent
Now, let's ask our agent something it cannot know from its training data:
result = agent.invoke({"messages": "What is the top 10 global news right now?"})
result{'messages': [
HumanMessage(content='What is the top 10 global news right now?', ...),
AIMessage(content='', ..., tool_calls=[{'name': 'web_search', 'args': {'num_results': 10, 'query': 'top 10 global news'}, ...}], ...),
ToolMessage(content="Search Results for 'top 10 global news':\n\n1. **What are the top 10 global news stories that have made**...", name='web_search', ...),
AIMessage(content='Here are the top 10 global news stories...', ...)
]}The messages list is the agent's full reasoning trajectory, and we can read the journey message by message.
- The
HumanMessageis our question. The loop begins. - The first
AIMessagehas empty content but carries atool_callsentry. This is the model's recommendation: useweb_searchwith this query. The model did not run anything. It only recommended, and the agent is the one that actually called the tool. - The
ToolMessageholds the search results, the formatted text our tool returned. - The final
AIMessageis the answer, written by the model after reading those results.
This is the same sequence we built by hand in the previous lesson. The difference is that this time, the agent built it for us.
Passing Existing Results Back to the Agent
We can also continue the conversation by passing the previous result straight back into the agent:
result1 = agent.invoke(result)Why does this work? Because result is itself a dictionary with a messages key, which is exactly the input shape the agent expects. The agent resumes from the existing message history, and this makes multi-turn follow-ups easy.
How Do Model Settings Change the Agent?
Now, let's see how the parameters we tabulated earlier change the agent's behaviour in practice.
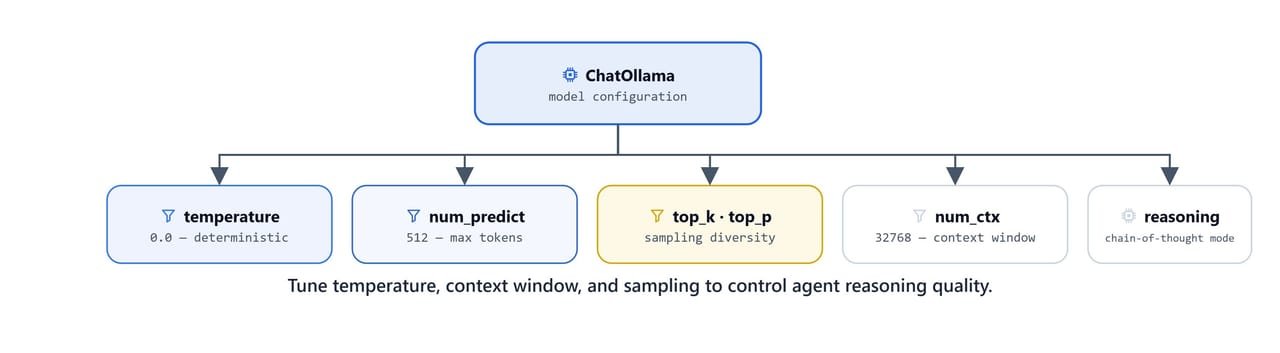
Tune temperature, context window, and sampling to control the agent's reasoning quality.
question = "What is the capital of France? Provide a brief explanation."

model1 = ChatOllama(
    model="qwen3",
    base_url="http://localhost:11434",
    temperature=0,
    top_p=1,
    repeat_penalty=1.2,
    num_predict=1000,
    num_ctx=4096,
    reasoning=True
)

agent1 = create_agent(model=model1, tools=[tools.web_search], system_prompt=system_prompt)
result1 = agent1.invoke({"messages": question})
Let's go through the choices one by one, because each number is a decision.
temperature=0makes the model deterministic: the same question gives the same answer every time. For an agent, the most delicate moment is when the model writes the tool call, and we want that decision precise and repeatable, not creative.top_p=1means we cut off no tokens by probability. Since the temperature is already 0, the model picks the single best token anyway.repeat_penalty=1.2gently discourages the model from repeating itself. A value of1.0would mean no penalty at all.num_predict=1000caps the answer at 1000 tokens, so a runaway answer cannot eat our time and memory.num_ctx=4096matters for agents especially. Tool results, like ten search results, get stuffed into the conversation, and if the window is too small, the model cannot even see all the results it asked for.reasoning=Trueturns on Qwen3's thinking mode, and this one deserves a closer look.
With reasoning=True, the model thinks step by step before it commits to a tool call, and we can read this thinking in additional_kwargs['reasoning_content']:
reasoning_content: "Okay, the user is asking for the capital of France and a brief explanation.
Let me start by recalling what I know. France is a country in Europe, and I believe the capital
is Paris. But wait, I should make sure that's correct. Maybe I should check using the web_search
tool to confirm..."
Here, we can see something interesting. The model already believes the answer is Paris, but it still decides to verify with the search tool, because our system prompt asked for accurate answers. The thinking gave it room to be careful instead of jumping at the first answer in its head.
Final answer after web search:
The capital of France is **Paris**. It has served as the political and administrative center of
France since the 3rd century, though it became the official capital after being liberated in 1944.
Paris is renowned for its cultural landmarks, historical significance, and role as a global hub
for art, fashion, and commerce.
Tip
reasoning=True enables Qwen3's extended thinking mode: the model reasons step by step before committing to a tool call or final answer. This improves accuracy for complex queries, but the thinking itself costs tokens and time. Turn it on for hard tasks and leave it off for simple lookups.
Can the Agent Pick Its Own Model?
In the real world, we often have two models available: a fast one that is cheap and quick, and a capable one that reasons better. Using the capable model for everything wastes time and compute, and using the fast model for everything gives weak answers on hard tasks. So, the question is: can the agent pick the right model on its own, for every single call?
So, here comes middleware into the picture. Middleware is code that sits between the agent and the model, and it can inspect or modify every model call before it happens. In simple words, middleware is a gatekeeper: every request to the model passes through it first, and the gatekeeper can swap in a different model. LangChain v1 gives us this through wrap_model_call.
Selection Logic
- Fewer than 3 messages: the conversation just started, so the work is probably simple. We use
qwen3, the fast model. - 3 or more messages: tool results have already arrived and the conversation is deeper. We switch to
llama3.2, the stronger model.
Why does message count work as a signal? Because every round of the agent loop adds messages. A long message list literally means the agent is deep into a multi-step task, and that is exactly when we want the better brain.
Real-World Applications
- Customer service bots: simple queries stay on the fast model, and complex escalations switch to the advanced model.
- Research assistants: quick fact lookups stay on Qwen3, and multi-step analysis moves to a larger model.
from langchain_ollama import ChatOllama
from langchain.agents import create_agent, AgentState
from langgraph.runtime import Runtime
import tools
from langchain.agents.middleware import wrap_model_call, ModelRequest, ModelResponse

basic_model = ChatOllama(model="qwen3", base_url="http://localhost:11434", num_predict=1000)
advanced_model = ChatOllama(model="llama3.2", base_url="http://localhost:11434", num_predict=1000)

@wrap_model_call
def dynamic_model_selection(request: ModelRequest, handler) -> ModelResponse:
    message_count = len(request.state["messages"])

    if message_count < 3:
        print(f"Using Qwen3 for {message_count} messages")
        request.model = basic_model
    else:
        print(f"Using llama3.2 for {message_count} messages")
        request.model = advanced_model

    return handler(request)
Here, we have built our gatekeeper. Let me explain each part.
- We create both model objects once, up front. The middleware runs on every single model call, so creating models inside it would repeat that construction cost for no reason.
@wrap_model_callmarksdynamic_model_selectionas middleware that wraps every model call the agent makes.request.state["messages"]is the current conversation. The middleware can see the full state of the agent, and we count the messages withlen().request.model = basic_modelswaps the model for this one call only. We are not rebuilding the agent. We are redirecting a single call to a different brain.handler(request)passes the modified request forward so the real model call happens. If we forget this line, the request never reaches any model and the agent stops.
Attach the middleware to the agent:
agent = create_agent(
    model=basic_model,
    tools=[tools.web_search],
    system_prompt=system_prompt,
    middleware=[dynamic_model_selection]
)
One question we might ask: we still pass model=basic_model here, so which one wins? The middleware wins. The model argument is only the default, and our gatekeeper overrides it on every call. Also, middleware takes a list, so we can stack several middlewares, and each request passes through all of them in order.
Verify the agent is a compiled graph:
agent<langgraph.graph.state.CompiledStateGraph object at 0x0000018E9E7D54D0>Here, we can see it with our own eyes: the agent is a CompiledStateGraph, the same LangGraph state machine we described at the start.
Helper Function
A small helper keeps our calls tidy. It wraps a plain message list into the state dictionary the agent expects:
def get_agent_output(messages: list):
    messages = {'messages': messages}
    result = agent.invoke(messages)
    return result
Run with two messages:
messages = ["How are you?", "What's the weather in Mumbai today?"]
result = get_agent_output(messages)Using Qwen3 for 2 messages
Using llama3.2 for 4 messagesHere, we can see the switch happening live. The first model call starts with our 2 messages, so the gatekeeper picks the fast Qwen3. Qwen3 recommends the web_search tool, and the tool call plus its result add two more messages, so the count becomes 4. When the loop returns to the model for the final answer, the gatekeeper counts 4 and switches to llama3.2. The fast model did the routing, and the strong model did the writing, each doing the job it is best at.
Full result trajectory:
result{'messages': [
HumanMessage(content='How are you?', ...),
HumanMessage(content="What's the weather in Mumbai today?", ...),
AIMessage(content='', ..., tool_calls=[{'name': 'web_search', 'args': {'num_results': 10, 'query': 'current weather in Mumbai'}, ...}], ...),
ToolMessage(content="Search Results for 'current weather in Mumbai':\n\n1. Mumbai weather: Sunny skies...\n https://timesofindia.indiatimes.com/...\n\n2. Mumbai weather update: IMD predicts partly cloudy skies...", ...),
AIMessage(content='The weather in Mumbai today is sunny with temperatures reaching 32.9°C...', ...)
]}How Do We Stream Agent Responses?
Till now, we have called invoke and waited for the complete result. But an agent thinks, searches, and thinks again, which can take several seconds, and making the user stare at a blank screen the whole time is a bad experience. So, we stream instead: we receive the agent's output piece by piece, as it is produced. Three modes are available, and each one answers a different question.
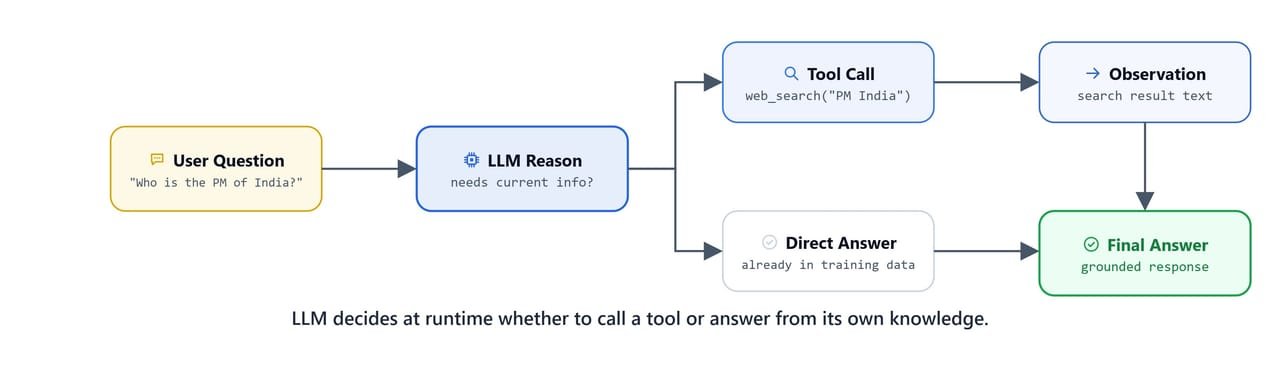
At runtime the LLM decides whether to call a tool or answer directly from its own knowledge.
stream_mode="values", Full State at Each Step
Returns the complete message list after every step. In simple words, each chunk holds the whole conversation so far, so chunk['messages'][-1] is always the newest message. This is the right mode for chat UIs that display incremental progress:
for chunk in agent.stream({"messages": messages}, stream_mode="values"):
    print(chunk['messages'][-1].content, end='', flush=True)
print("\n\n------")What's the weather in Mumbai today?
------
Using Qwen3 for 2 messages
------
Search Results for 'weather in Mumbai today':
1. **Mumbai Weather Today 21 October 2025, Tomorrow & Weekly IMD**
Mumbai Weather Today: temperatures will be between 27 C and 37 C...
https://www.timesnownews.com/weather/mumbai
...
------Here, we can watch the conversation grow one step at a time: first our question, then the tool activity, then the results, and finally the answer.
stream_mode="updates", Only Changed State
Returns only the delta at each step, which is more efficient for processing. Each chunk is labelled by which node just finished. If the key is model, the model node just spoke or recommended a tool. If the key is tools, the tool node just returned a result. In simple words, we are watching the agent loop live, node by node:
for chunk in agent.stream({"messages": messages}, stream_mode="updates"):
    if 'model' in chunk:
        chunk['model']['messages'][-1].pretty_print()
    if 'tools' in chunk:
        chunk['tools']['messages'][-1].pretty_print()
print("\n\n------")Using Qwen3 for 2 messages
================================== Ai Message ==================================
I'm just a helpful AI assistant, but I'm here and ready to help! 😊
For the weather in Mumbai today, let me check that for you:
Tool Calls:
web_search (5baa36dd-...)
Args:
num_results: 5
query: weather in Mumbai today
------
================================= Tool Message =================================
Name: web_search
Search Results for 'weather in Mumbai today':
1. **Mumbai Weather Today 21 October 2025...**
Mumbai Weather Today: temperatures will be between 27 C and 37 C...
...
------Tip
Use stream_mode="values" for building chat UIs where you display the growing conversation. Use stream_mode="updates" for logging pipelines where you only care about what changed. Use stream_mode="messages" (not shown) for token-by-token streaming of the final answer only.
Agent Streaming Modes & Configurations
Let me tabulate the three modes for your better understanding so that you can decide which one to use based on your use case.
| Streaming Mode | Output Deltas | Best Use Case |
|---|---|---|
stream_mode="values" |
Full conversation history at each step | Building real-time chat UIs to render state progression |
stream_mode="updates" |
Only the raw state change of the current step | Backend logging, auditing agent trajectories, or routing pipelines |
stream_mode="messages" |
Token-by-token generation of the final assistant response | Displaying live typing effects for user interfaces |
What You Built
In this lesson, we built fully autonomous LangChain agents with create_agent. Let's recap what we learned.
- Basic agent:
create_agent(model, tools, system_prompt)plus.invoke()runs the complete tool loop automatically. - Model parameters:
temperature,num_predict,top_p, andreasoningcontrol the brain, and we saw why each value is a decision. - tools.py: a reusable
web_searchtool backed by DuckDuckGo that any notebook can import, with a docstring the model actually reads. - Dynamic model selection:
wrap_model_callmiddleware switches betweenqwen3andllama3.2based on message count, so each model does the job it is best at. - Streaming: three modes (
values,updates,messages) for three different consumption patterns.
The agent we built is a compiled CompiledStateGraph, a LangGraph state machine that runs the reasoning loop until completion. The model recommends the tools, the agent actually calls them, and we only describe what we want. In the previous lesson, we were the loop. In this lesson, we built the loop once, and now it runs itself.