LangChain is a framework that helps us build applications on top of language models. In simple words, LangChain gives us one way of writing code that works with any model provider, cloud or local. The same code that talks to GPT-4 can talk to a local Ollama model by swapping one line. That is exactly why we use it in this series.
In this tutorial, we will learn the installation, the environment setup, and the two ways of calling the model: waiting for the full answer at once, or streaming it word by word.
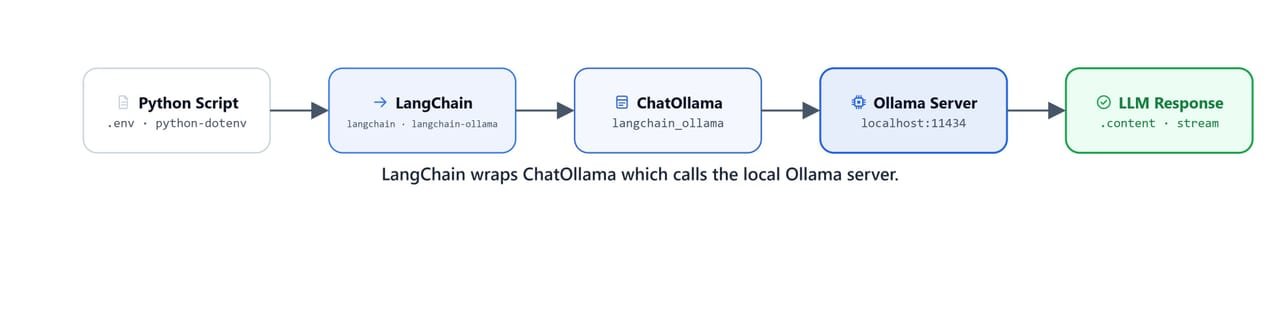
LangChain wraps ChatOllama, which in turn calls the local Ollama server running on your machine.
Prerequisites: Ollama installed and running locally with qwen3 pulled. See the Ollama Setup Guide. Python 3.10+ and pip available.
How Do We Install LangChain?
Install the Packages
We install the three required packages in one command. Each one has a job: langchain is the framework itself, langchain-ollama provides the ChatOllama integration that talks to our local server, and python-dotenv manages the .env loading we will do next.
pip install langchain langchain-ollama python-dotenvOn Linux/macOS: use pip or pip3 depending on your Python setup.
Tip
Use a virtual environment to keep your project dependencies isolated:
python -m venv .venv
.venv\Scripts\activate
On Linux/macOS: source .venv/bin/activate
How Do We Load Environment Variables?
We store API keys and configuration (LangSmith tracing, endpoints, and so on) in a .env file at the root of our project. Why a file instead of hardcoding? Because keys in code get committed and leaked, while a .env file stays on our machine. We load it at the top of our script:
from dotenv import load_dotenv

load_dotenv('.env')TrueHere, the return value of True means at least one variable loaded from the file. If we see False, the .env file was not found. We should check that it exists in the working directory.
Note
LangSmith provides tracing and observability for LangChain. To enable it, add these keys to your .env file:
LANGCHAIN_API_KEY=your_key_here
LANGCHAIN_TRACING_V2=true
LANGCHAIN_PROJECT=my-project
Get your API key at smith.langchain.com.
Why Do We Pull the Model First?
Before running any code, we make sure the target model is available locally. Remember from the Ollama Setup Guide: the weights must be on our disk before anything can run.
ollama pull qwen3On Linux/macOS: same command; ollama is cross-platform.
Important
ChatOllama fails at runtime if the model is not pulled. Run ollama list to confirm the model name appears before executing your script.
How Do We Chat with a Local LLM?
What Is ChatOllama?
ChatOllama is the bridge between LangChain and Ollama. It connects to the Ollama server running at localhost:11434. We set the model name, the temperature, and the maximum output tokens right when we create it:
from langchain_ollama import ChatOllama

llm = ChatOllama(
    base_url="http://localhost:11434",
    model="qwen3",
    temperature=0.8,
    num_predict=256
)
Here, we have created our llm object, and each argument is a decision. Let me tabulate them for your better understanding.
| Parameter | Type | Effect |
|---|---|---|
base_url |
str |
Ollama server URL; default is http://localhost:11434 |
model |
str |
Model name exactly as it appears in ollama list |
temperature |
float |
Randomness (0 is deterministic, 1 is creative). 0.8 is a good default |
num_predict |
int |
Maximum tokens to generate per response |
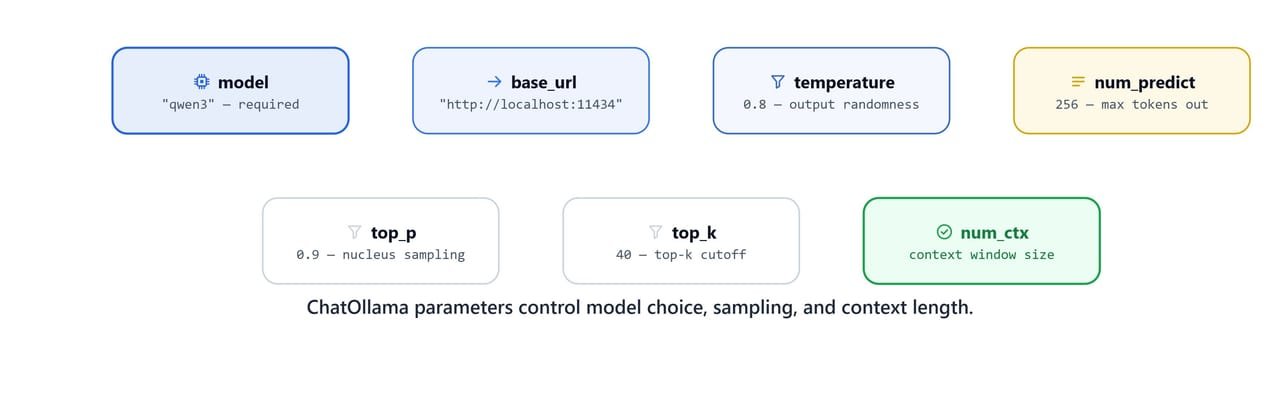
ChatOllama parameters control model choice, sampling behaviour, and context length.
Note
base_url defaults to http://localhost:11434 if omitted. Include it explicitly when connecting to a remote Ollama instance or a custom port.
How Do We Invoke the Model?
Now, let's talk to the model. We pass a prompt string to llm.invoke(). It waits until the full answer is ready, and then it returns a message object. We read the generated text from .content:
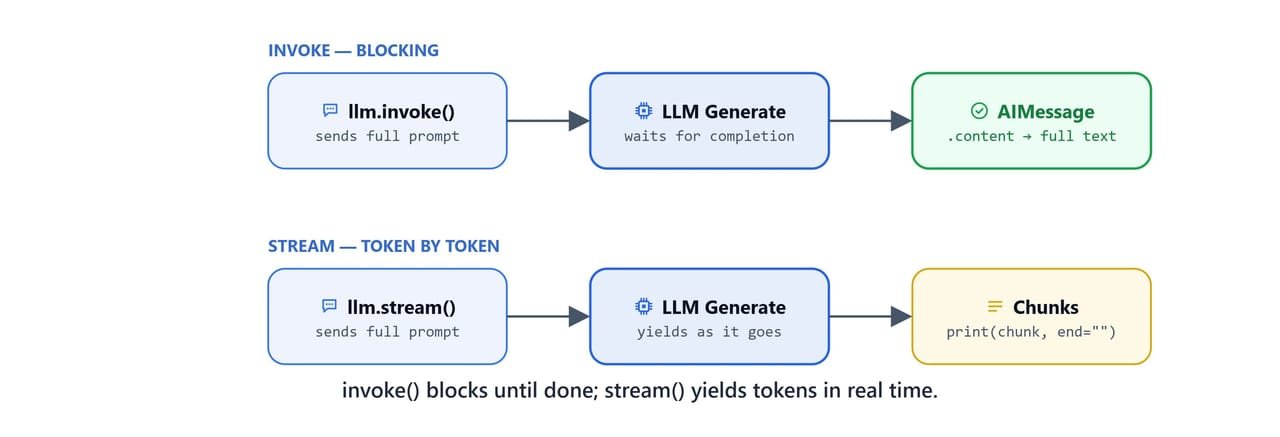
invoke() blocks until the response is complete; stream() yields tokens in real time.
response = llm.invoke("What is the theory of relativity? Answer in 5 sentences.")
print(response.content)The theory of relativity, developed by Albert Einstein, consists of two parts: special relativity (1905) and general relativity (1915). Special relativity introduced the idea that the laws of physics are the same for all non-accelerating observers and that the speed of light is constant regardless of the observer's motion. It also established the famous equation E=mc², showing that mass and energy are interchangeable. General relativity extended this to include gravity, describing it not as a force but as the curvature of spacetime caused by mass. Together, they revolutionized our understanding of space, time, and the structure of the universe.It works. Our Python code just talked to a model running entirely on our own machine. The answer came back as a normal Python object that we can print, store, or pass along.
How Do We Stream the Response?
Waiting for the full answer is fine for short outputs. But for long answers or a chat interface, the user stares at nothing while the model writes. So, here comes llm.stream() to the rescue. It gives us the answer one small chunk at a time instead of all at the end:
for chunk in llm.stream("What is the theory of relativity? Answer in 5 sentences."):
    print(chunk.content, end="", flush=True)
Tip
Use end="" and flush=True in print() so tokens appear inline as they arrive instead of buffering line-by-line. This gives the same feel as ChatGPT's typewriter effect.
What Is Inside the Response Metadata?
The response object returned by llm.invoke() carries more than the text. It also carries statistics in response_metadata. These numbers tell us how the model performed: how long it took, how many tokens went in, and how many came out. We use this to debug slow calls and measure our prompts:
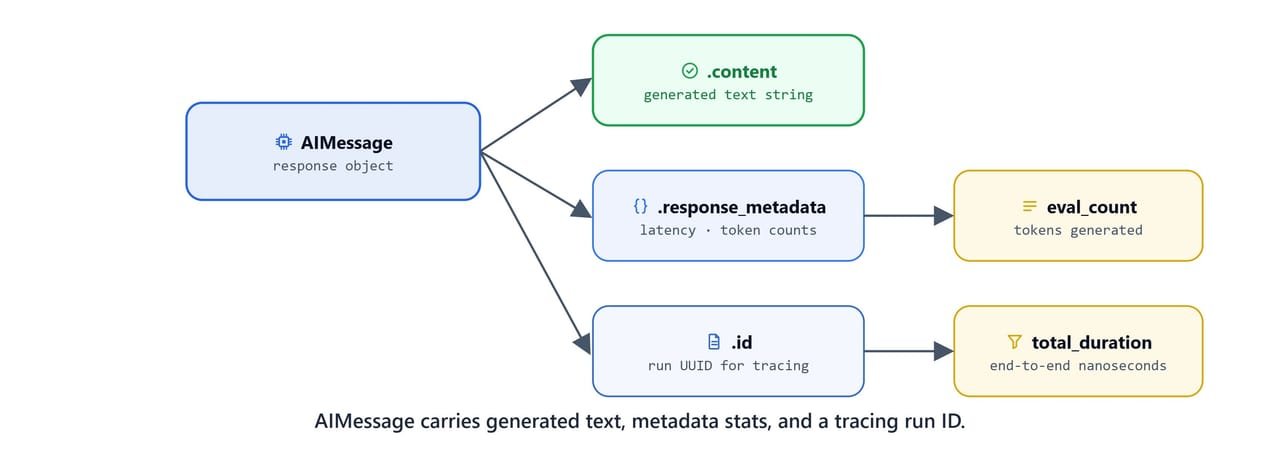
An AIMessage carries the generated text, metadata stats (timings, token counts), and a tracing run ID.
response.response_metadata{
"model": "qwen3",
"created_at": "2025-10-22T12:16:31.9173234Z",
"done": true,
"done_reason": "stop",
"total_duration": 2630496300,
"load_duration": 2149414600,
"prompt_eval_count": 100,
"prompt_eval_duration": 17446400,
"eval_count": 140,
"eval_duration": 397223200,
"model_name": "qwen3",
"model_provider": "ollama"
}Here, we can see the full statistics of our call. Let me explain the key fields.
| Field | Description |
|---|---|
total_duration |
End-to-end latency in nanoseconds (divide by 1e9 for seconds) |
load_duration |
Time spent loading the model into memory, high on first call, near-zero after warmup |
prompt_eval_count |
Number of tokens in the input prompt |
prompt_eval_duration |
Time spent processing the prompt (nanoseconds) |
eval_count |
Number of tokens generated in the response |
eval_duration |
Time spent on generation (nanoseconds) |
done_reason |
Why generation stopped, "stop" means a natural end; "length" means num_predict was hit |
One field deserves special attention: done_reason. If we ever see our answers cut off mid-sentence, this field tells us why. A value of "length" means the model hit our num_predict limit, and the fix is simply to raise it.
Tip
To calculate tokens per second for generation:
tps = response.response_metadata['eval_count'] / (response.response_metadata['eval_duration'] / 1e9)
print(f"{tps:.1f} tokens/sec")
Quick Reference
Let's put everything we learned in one place for quick copy-paste.
Package Install
pip install langchain langchain-ollama python-dotenvMinimal Working Example
from dotenv import load_dotenv
from langchain_ollama import ChatOllama

load_dotenv('.env')

llm = ChatOllama(
    model="qwen3",
    temperature=0.8,
    num_predict=256
)

# Single blocking call
response = llm.invoke("Explain transformers in 3 sentences.")
print(response.content)

# Streamed call
for chunk in llm.stream("Explain transformers in 3 sentences."):
    print(chunk.content, end="", flush=True)
ChatOllama Key Parameters
| Parameter | Default | Description |
|---|---|---|
model |
required | Model name (required) |
base_url |
http://localhost:11434 |
Ollama server address |
temperature |
0.8 |
Output randomness |
num_predict |
128 |
Max tokens to generate |
top_p |
0.9 |
Nucleus sampling threshold |
top_k |
40 |
Top-k sampling cutoff |
This is how we get started with LangChain. We installed three packages, connected ChatOllama to our local Ollama server, and talked to the model in two ways: invoke() for the full answer at once, and stream() for the answer token by token. Everything we build in this series stands on this one small setup.