A server stuck on our machine helps only us. Publishing it to PyPI turns it into a one-command install, uvx research-assistant-mcp, that anyone (and any Claude Desktop config) can run. In this blog, we package the research server from earlier into an installable Python package with minimal code changes.
The reference for this lesson is the author's published package: the repo at github.com/laxmimerit/research-assistant-mcp and the package at pypi.org/project/research-assistant-mcp.
Note
Prerequisites: the server from Research Assistant with MCP and LangGraph, uv installed, and a free PyPI account.
The package layout

PyPI packages use a src/ layout. Restructure the project so the server lives inside an importable package, and add the standard supporting files.
research-assistant-mcp/
├── src/
│   └── research_assistant_mcp/
│       ├── __init__.py          # Package initialization
│       └── server.py            # Moved from the project root
├── .github/
│   └── workflows/
│       ├── publish.yml          # Auto-publish to PyPI
│       └── test.yml             # CI build testing
├── pyproject.toml
├── README.md                    # Documentation
├── LICENSE                      # MIT License
├── CHANGELOG.md                 # Version history
├── MANIFEST.in                  # Package manifest
└── .gitignore
The key moves:
server.pymoves tosrc/research_assistant_mcp/server.py.- Add an empty
__init__.pyto make the folder a package. - Add
README.md,LICENSE(MIT),.gitignore,MANIFEST.in, andCHANGELOG.md. - Add GitHub Actions workflows for testing and auto-publishing.
Code change 1: configurable data path
A published package cannot write inside its own install directory. That path is read-only and shared. Make the database location a required environment variable instead.
Replace the hard-coded path:
current_dir = Path(__file__).parent.absolute()
CHROMA_DB_ROOT = current_dir / "research_chroma_dbs"
With an environment-driven path:
RESEARCH_DB_PATH = os.getenv("RESEARCH_DB_PATH")
if not RESEARCH_DB_PATH:
    raise ValueError(
        "RESEARCH_DB_PATH environment variable is required. "
        "Please set it in your configuration."
    )

CHROMA_DB_ROOT = Path(RESEARCH_DB_PATH) / "research_chroma_dbs"
This removes the dependency on the install location, creates research_chroma_dbs inside whatever path the user provides, and fails fast with a clear error if the variable is missing.
Important
Failing fast is intentional. A packaged server should never silently write to a surprising location. Requiring RESEARCH_DB_PATH makes the storage location explicit and predictable.
Code change 2: an entry point
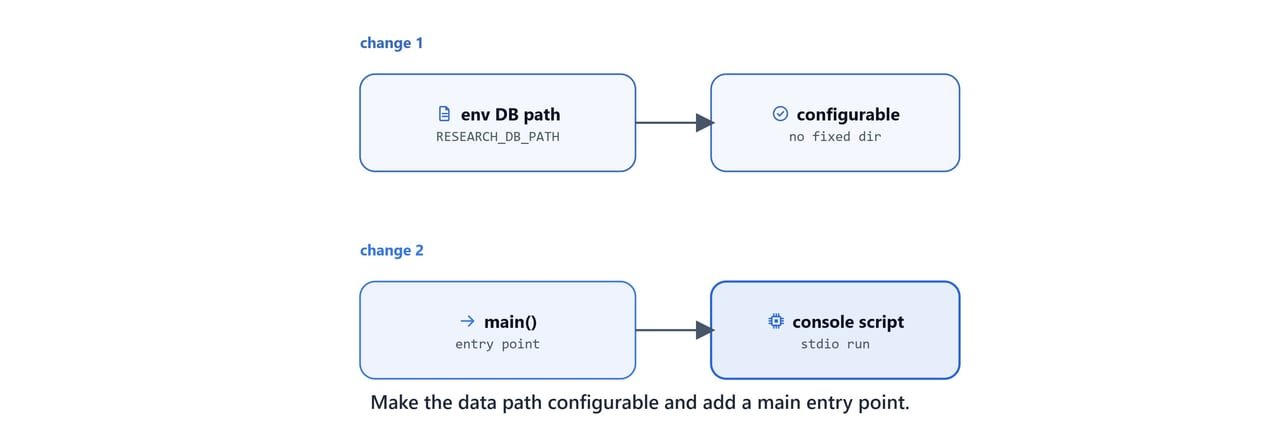
Console scripts call a function, not a file. Wrap the run call in a main() function and use the MCP-standard stdio transport:
Replace:
if __name__ == "__main__":
    mcp.run(transport="http", host="0.0.0.0")
With:
def main():
    """Main entry point for the Research Assistant MCP server."""
    mcp.run(transport="stdio")


if __name__ == "__main__":
    main()
The main() function becomes the target of the console command. stdio is the right transport for a package that clients like Claude Desktop launch as a subprocess.
Configuring pyproject.toml
Update the metadata and add the build, script, and entry-point sections. The package name (research-assistant-mcp), command name (research-assistant-mcp), and module name (research_assistant_mcp) tie together here.
[project]
name = "research-assistant-mcp"
version = "0.1.0"
description = "A Model Context Protocol server for research assistance with ChromaDB vector storage"
readme = "README.md"
requires-python = ">=3.11"
authors = [{ name = "Your Name", email = "you@example.com" }]
keywords = ["mcp", "research", "chromadb", "langchain"]
classifiers = [
    "Programming Language :: Python :: 3",
    "License :: OSI Approved :: MIT License",
]
dependencies = [
    "fastmcp",
    "chromadb",
    "langchain-chroma",
    "langchain-openai",
    "python-dotenv",
]

[project.urls]
Homepage = "https://github.com/your-username/research-assistant-mcp"
Repository = "https://github.com/your-username/research-assistant-mcp"
Issues = "https://github.com/your-username/research-assistant-mcp/issues"

[project.scripts]
research-assistant-mcp = "research_assistant_mcp.server:main"

[build-system]
requires = ["hatchling"]
build-backend = "hatchling.build"

[tool.hatch.build.targets.wheel]
packages = ["src/research_assistant_mcp"]
The two most important sections:
[project.scripts]maps the commandresearch-assistant-mcptoresearch_assistant_mcp.server:main. That is whatuvx research-assistant-mcpruns.[build-system]uses Hatchling, and[tool.hatch.build.targets.wheel]tells it the package lives undersrc/.
Note
Replace your-username, the author name, and email with your own. Pin dependency versions if you need fully reproducible installs.
Build and publish

With the package configured, build the distributions and upload them. uv provides both steps.
uv buildThis creates a source distribution (.tar.gz) and a wheel (.whl) in a dist/ folder. Then publish to PyPI using an API token:
uv publish --token YOUR_PYPI_TOKENOn Linux/macOS: the same commands apply. You can also set UV_PUBLISH_TOKEN in your environment instead of passing --token.
Important
PyPI no longer accepts username/password publishing. Generate an API token from your PyPI account settings. Never commit the token; pass it via --token or the UV_PUBLISH_TOKEN environment variable.
Tip
The official packaging guide is at docs.astral.sh/uv/guides/package. To publish automatically on every release, use a GitHub Actions workflow with trusted publishing, no token needed. You add the repository as a trusted publisher in your PyPI project settings.
Install and use the published server
Once published, anyone can run it without cloning anything:
uvx research-assistant-mcpOr install it into an environment:
uv pip install research-assistant-mcpWire it into Claude Desktop with the required environment variables:
{
  "mcpServers": {
    "research-assistant": {
      "command": "uvx",
      "args": ["research-assistant-mcp"],
      "env": {
        "OPENAI_API_KEY": "your-api-key-here",
        "RESEARCH_DB_PATH": "C:\\Users\\your-username\\research-data"
      }
    }
  }
}
Important
Replace your-api-key-here with your OpenAI key and set RESEARCH_DB_PATH to a writable folder. Recall from Connect MCP Servers to Claude Desktop that this file holds secrets. Keep it private.
On Linux/macOS: use a path like /home/your-username/research-data for RESEARCH_DB_PATH.
Course wrap-up
We have gone the full distance. We went from installing the toolchain to publishing a reusable MCP server the whole community can install with one command.
- Restructure to a
src/research_assistant_mcp/package with the standard supporting files. - Make the data path an environment variable and expose a
main()entry point. - Configure
pyproject.tomlwith[project.scripts]and a Hatchling build backend. uv build, thenuv publishwith a token (or GitHub Actions trusted publishing).
This is how MCP Mastery comes together. We can now build MCP servers and clients, connect them to Claude Desktop and local agents, add RAG and web research, deploy to the cloud, and ship to PyPI. Start back at Introduction to Model Context Protocol any time you need a refresher on the fundamentals.


