
Scikit-LLM is a Python library that lets us use a language model through the familiar scikit-learn methods fit() and predict(). In simple words, we hand it some texts and a list of labels, and it asks the model to pick a label for each text.
In this blog, we will learn how that works on Day 1 of a 15-day series. We will sort course-support tickets into billing, login and cancellation, using Qwen 3.8 27B running on our own machine through Ollama. We will also build a tiny keyword rule and find out what our numbers really tell us.
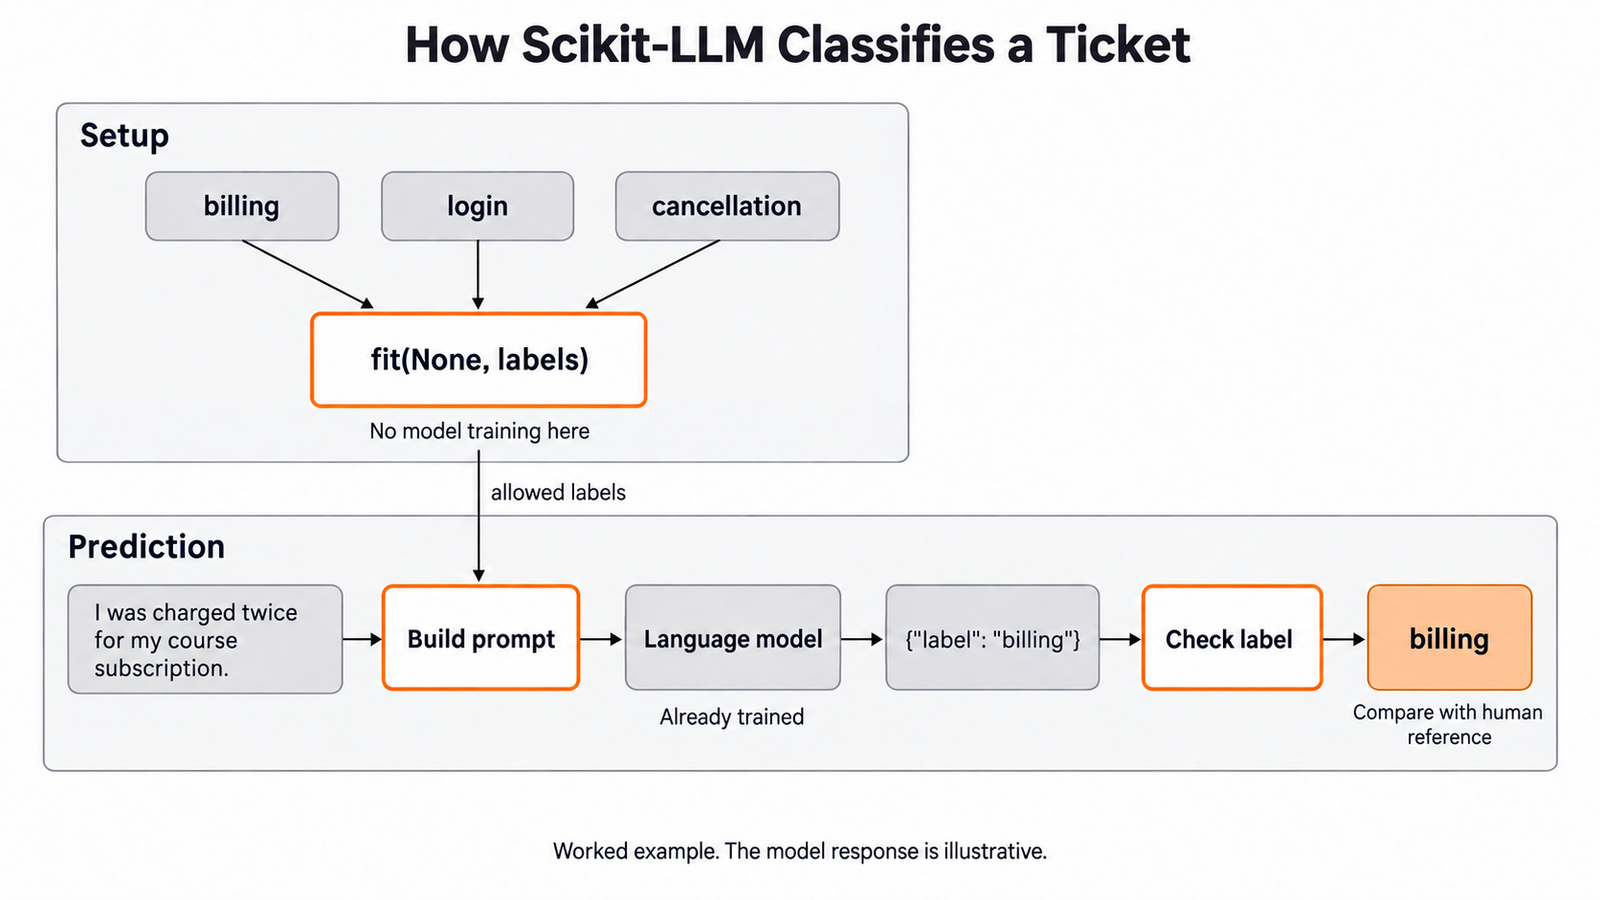
The full path has two stages. First we set the allowed labels. Then we send a ticket and check the label that comes back.
Start with the Job We Want to Do
Our support inbox has three categories: billing, login and cancellation. For this first lesson, every message has one main issue. The program should return one category for each message.
This task is called text classification: choosing a category for a piece of text. The category is also called a label. A classifier is the part of our program that makes that choice.
Think of sorting letters into named trays. The message is the letter, and billing is one tray. Before sorting anything, we must agree on what belongs in each tray.
Let me tabulate our three trays.
| Label | Meaning in our teaching example |
|---|---|
billing |
A charge, payment or invoice issue. |
login |
Trouble entering an account or resetting access. |
cancellation |
A request to stop a plan or its renewal. |
These meanings are our task policy. The library does not supply them, and another business could draw the lines differently.
A message can also carry two issues, such as "Cancel my plan and refund the duplicate charge". We will handle more than one label on Day 6. Today, we use simple messages so we can follow the whole process.
What Scikit-LLM Actually Does
There are three pieces to keep apart. Our Python code holds the texts and the allowed labels. Scikit-LLM turns them into a request and reads the reply. The language model writes that reply.
An LLM, or large language model, is a model trained on a lot of text. It can write text in reply to an input. Here, we use that skill to ask for a category.
In this series, the model runs on our own computer inside Ollama. Ollama is a free app that downloads models and serves them at a local web address. Scikit-LLM sends each request to that address, much like it would send one to a hosted service.
The route the library uses to reach a model is called a backend. We will look at backends closely on Day 2, including a free hosted option on OpenRouter.
Here, the request starts in our Python code, passes through Scikit-LLM, and reaches Ollama on the same computer.
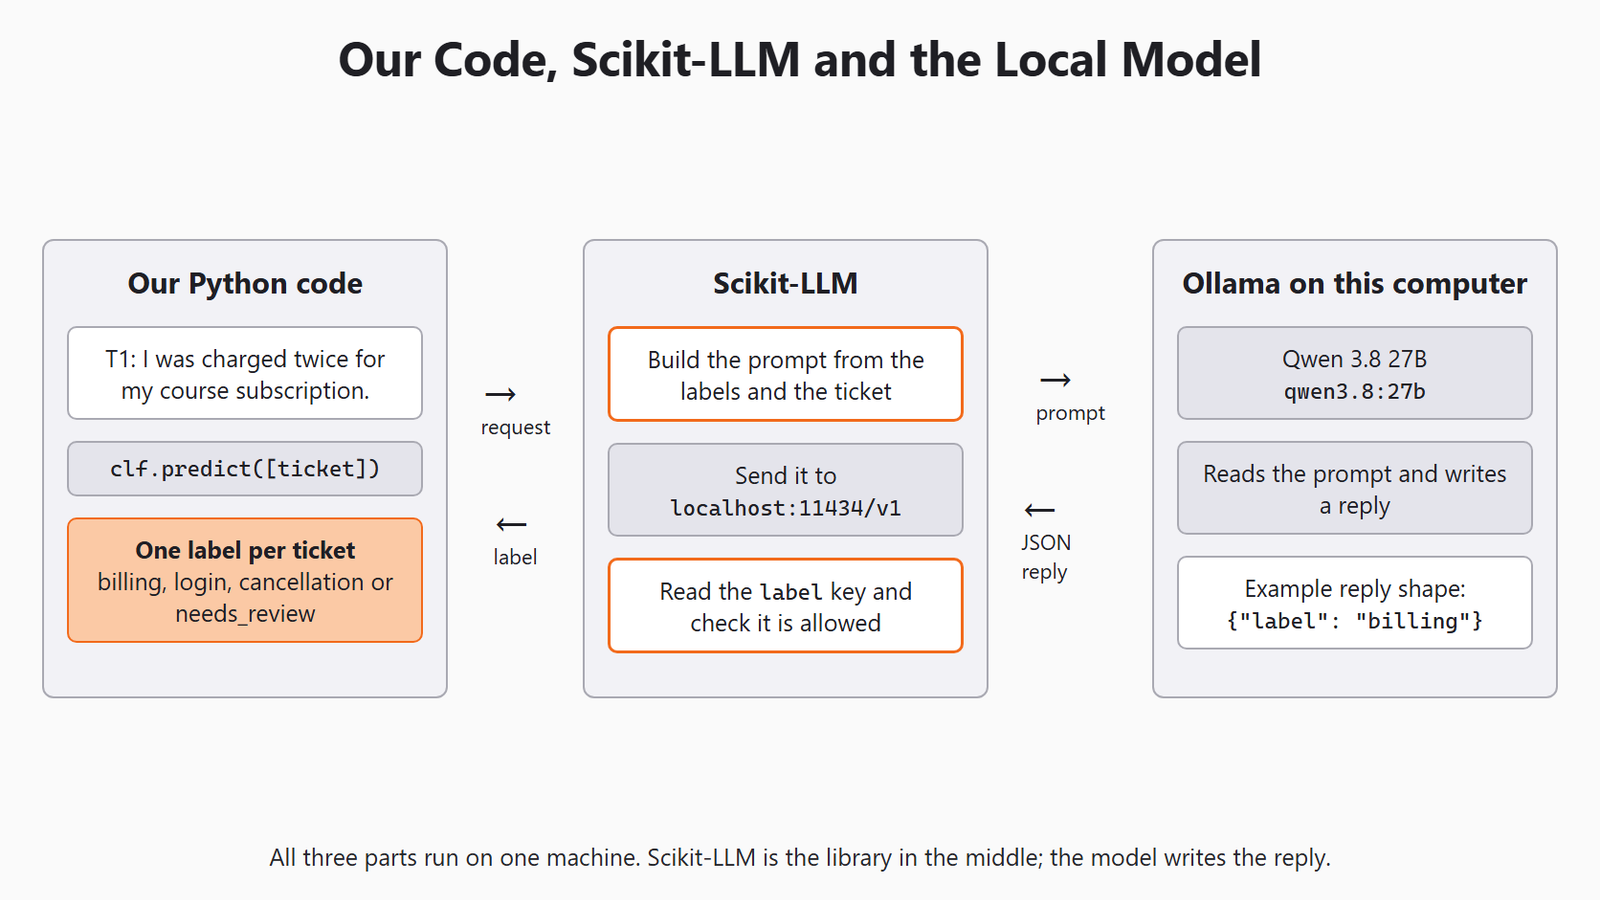
Installing scikit-llm installs Python code only. It does not put a language model on our machine. We install Ollama and download the model as separate steps.
Why Use Scikit-LLM, and When Does It Fit?
Scikit-LLM is worth trying when we apply the same language task to many texts. Support categories are one example. Summaries and turning text into numbers are others we will reach later.
An estimator is the Python object that offers methods such as fit() and predict(). A method is simply a function attached to an object. This shape keeps a small task easy to inspect: set it up, pass in texts, then check what comes back.
The interface is handy, but it is still a project choice. Let me tabulate when each approach makes sense.
| Situation | A sensible first approach |
|---|---|
A fixed code such as PAYMENT_FAILED determines the category |
A direct rule or lookup. |
| We have many labeled messages and stable categories | A local text-classification baseline. |
| We have clear categories but few labeled examples | Try a zero-shot LLM classifier and evaluate it. |
| Our request needs provider-specific tools or response controls | Check whether using that provider's API directly is a better fit. |
A small classic model may be faster on our workload. An LLM may cope better with new wording, but we must measure that. The package name is not proof of accuracy.
What Zero-Shot Means Here
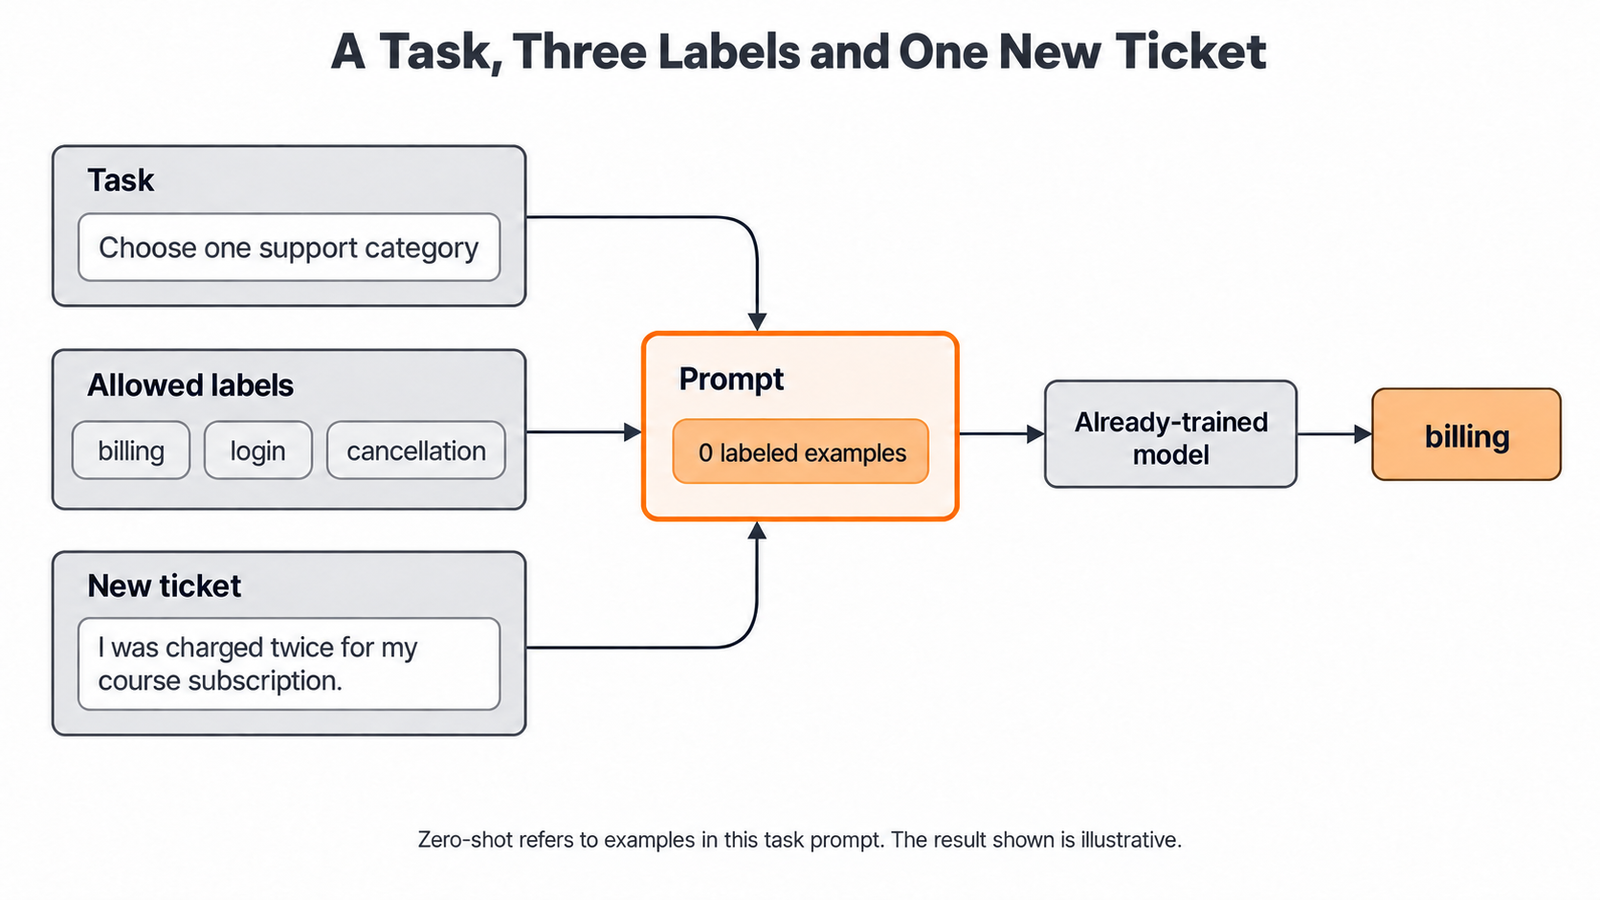
Zero-shot classification asks the model to choose a label without any labeled examples of our task. A prompt is the instruction and text we send to the model.
Our request needs three ideas: choose a support category, choose from our three labels, and read the new message. That is enough to ask for a prediction. It is not enough to promise a correct one. Zero-shot classification
The model was trained long before our program uses it. "Zero-shot" only describes the examples we send with the request. It says nothing about how the model learned language.
Here is a short teaching version of the request. It is not the library's exact prompt.
Choose one support category: billing, login or cancellation.
Message: I was charged twice for my course subscription.
A person would pick billing, so that is our reference answer. It is our answer key, not the model's reply.
A zero-shot request holds the task, the allowed labels and the new ticket, with no labeled examples.
A Short scikit-learn Refresher
In scikit-learn, fit(X, y) and predict(X) are the two main methods. X holds the inputs and y holds the answers for those inputs. For a normal classifier, fit() learns from those pairs.
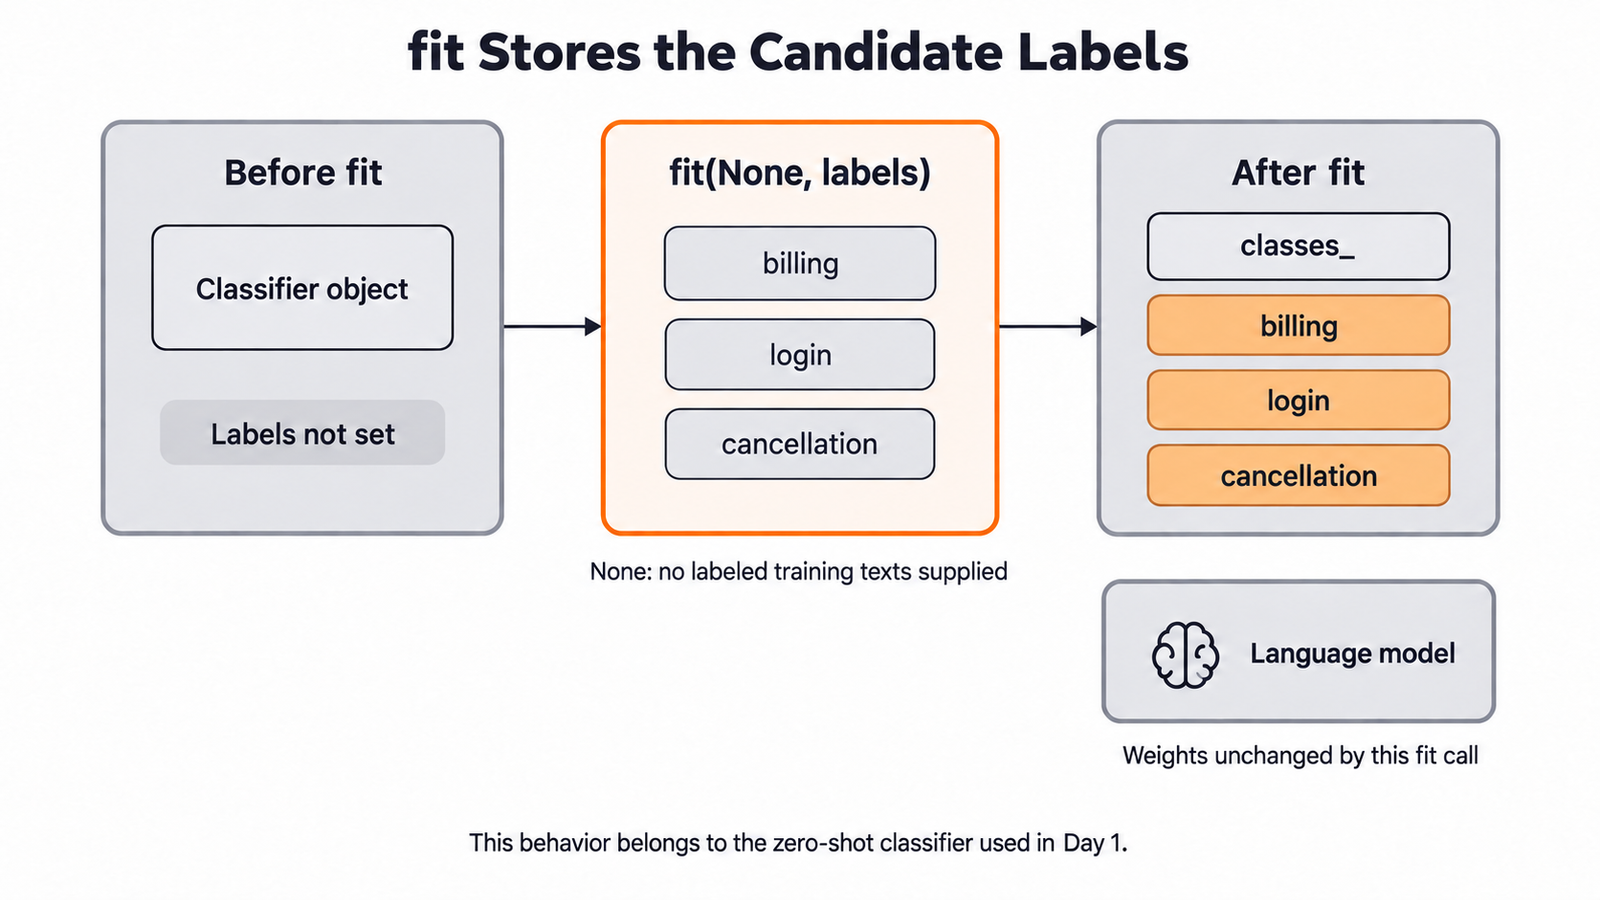
Our zero-shot classifier uses the same method names, but its fit() only stores the candidate labels. It does not change the model's weights, the numbers the model learned during training. The model is only called during predict().
Other estimators in this series do different work in fit(). We will trace each one when we meet it.
Install an Isolated Copy
We will use Scikit-LLM 1.4.3, the release we checked this lesson's code with. Pinning a version makes the example easy to repeat. The package needs Python 3.9 or later, and we ran our checks with Python 3.14.4. Package release and requirements
A virtual environment keeps this lesson's packages in one folder, away from other projects. In a new lesson folder, run this Windows command to create one:
python -m venv .venvOn Linux/macOS: use python3 -m venv .venv.
Next, we install into that environment. -m pip runs the installer that belongs to that Python, and ==1.4.3 picks the version we checked.
.\.venv\Scripts\python.exe -m pip install "scikit-llm==1.4.3"On Linux/macOS: use .venv/bin/python -m pip install "scikit-llm==1.4.3".
Now we open that environment's Python. We run all the Python blocks below in this one session, in order. In a notebook, we pick this environment as the kernel.
.\.venv\Scripts\python.exeOn Linux/macOS: use .venv/bin/python.
Our first import reads the installed package version. It confirms that we are in the environment we meant to use.
from importlib.metadata import version

print(version("scikit-llm"))1.4.3Here, we can see version 1.4.3, so the right package is active.
Install Ollama and the Qwen 3.8 27B Model
Ollama gives us the model itself. We download it from ollama.com and install it like any other app. Once installed, it keeps a small server running in the background at http://localhost:11434.
Next, we download the model in a new terminal. qwen3.8:27b is the model name and tag in Ollama's library.
ollama pull qwen3.8:27bWe also pull a small embedding model now. We will not need it until Day 7, where it turns text into numbers.
ollama pull nomic-embed-textNote
qwen3.8:27b is a 16.5 GB download, and nomic-embed-text is 262 MB. The model runs on our own hardware, so there is no API bill and no account key. How fast it answers depends on the machine's memory and GPU.
Our Six-Ticket Teaching Set
We will work with six messages written for this lesson. They are made-up examples, not customer records. The first three contain words our small rule will spot. The other three say similar things in different words.
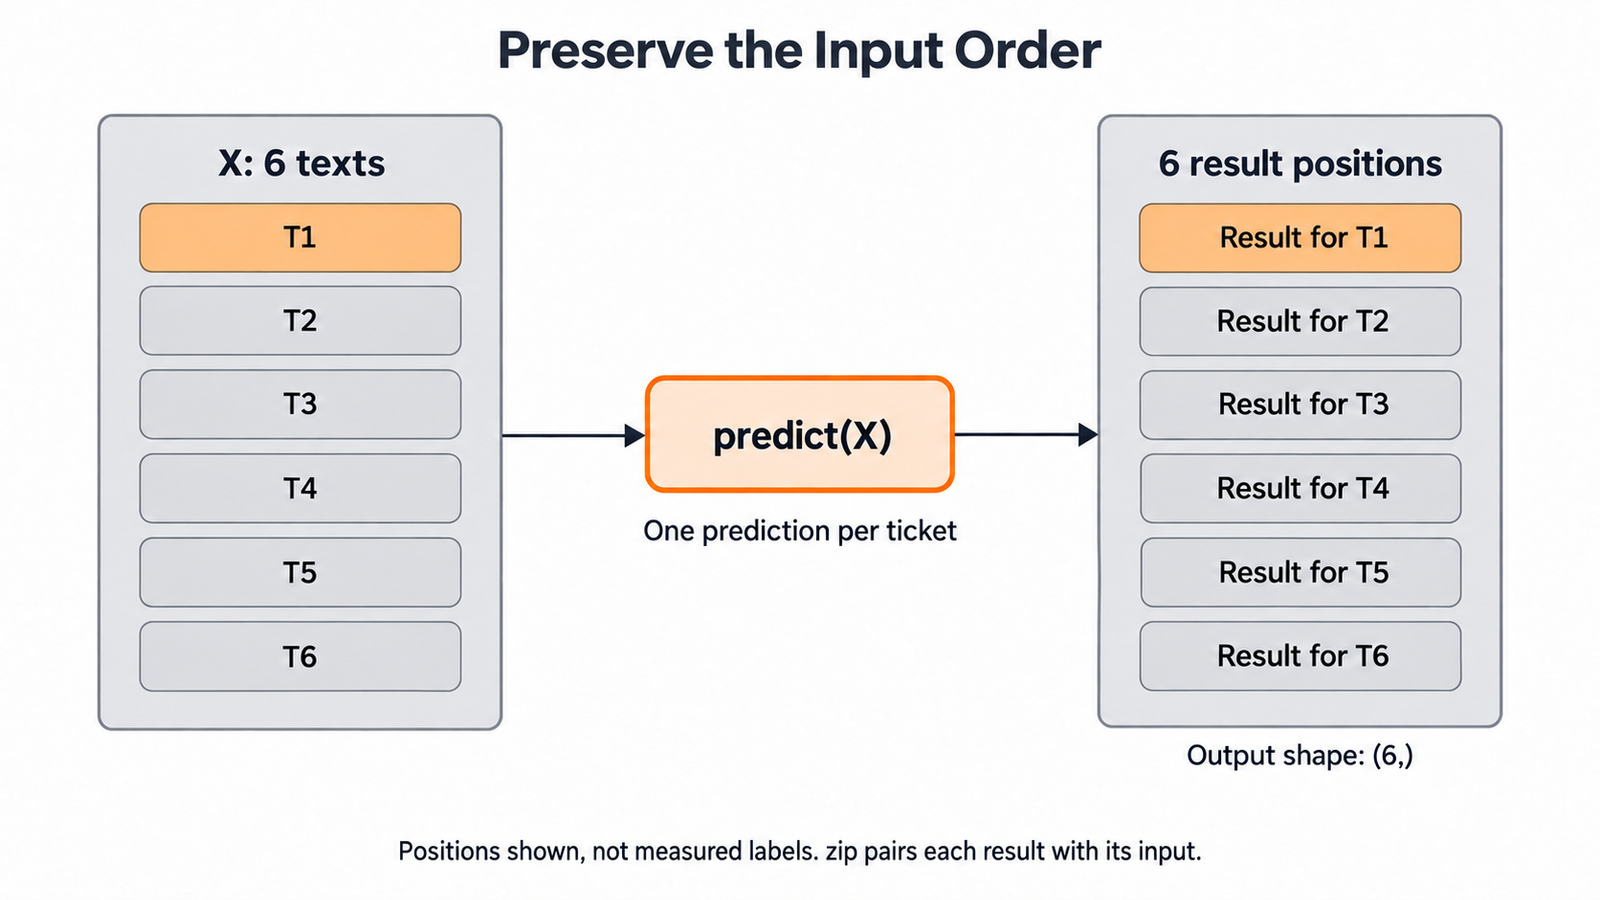
X is a Python list, and each string is one message. In the figures, we call them T1 to T6 in list order. The order matters, because we compare each prediction with the answer at the same position.
X = [
    "I was charged twice for my course subscription.",
    "My account password reset link has expired.",
    "Please cancel my course subscription.",
    "The same course payment appears twice on my bank statement.",
    "I cannot get into my account after changing phones.",
    "Please stop renewing my plan next month.",
]
We write the human answers in a separate list. y_reference is only for checking. We never send these answers to the zero-shot classifier.
y_reference = [
    "billing", "login", "cancellation",
    "billing", "login", "cancellation",
]
The candidate labels are the categories a prediction may choose. This list tells the model its choices, not which answer belongs to which message.
candidate_labels = ["billing", "login", "cancellation"]The candidate labels go into the classifier, while each ticket's human answer stays aside for the check.
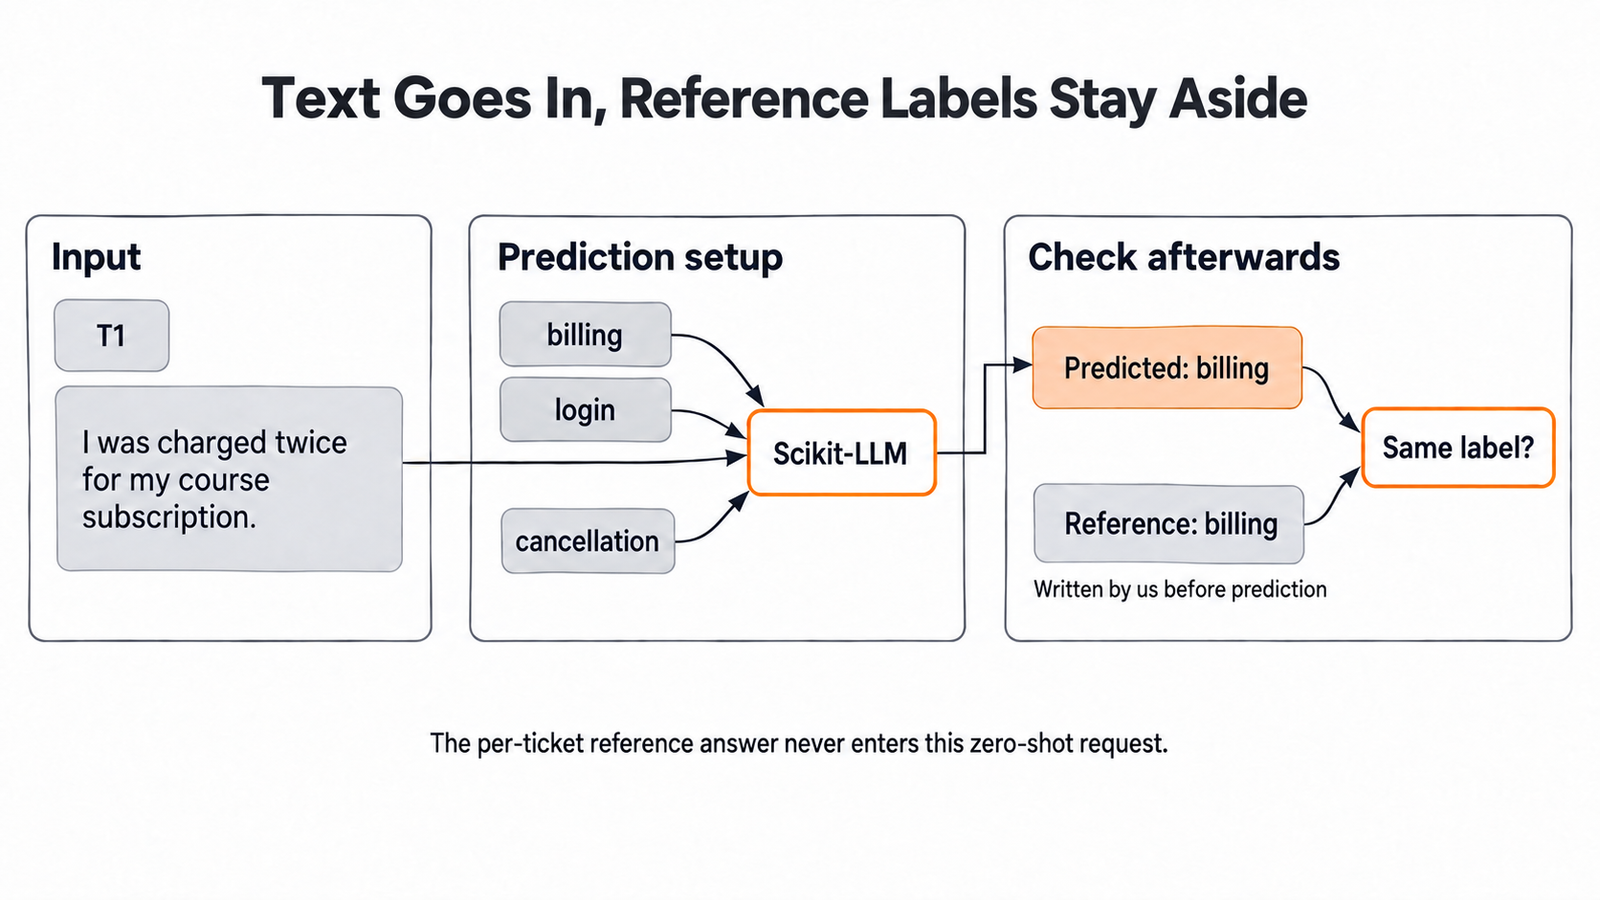
So, the three lists have three jobs. X has six things to read, y_reference has six answers to check, and candidate_labels has three allowed choices.
A Tiny Rule Baseline
A baseline is a simple method we compare a bigger one against. Ours looks for three exact words. We lowercase each message first, so Charged and charged are treated the same.
The if checks run in order. The first match returns a category and ends the function. If nothing matches, the rule returns needs_review, which means a person should look.
def rule_label(text):
    text = text.lower()
    if "charged" in text:
        return "billing"
    if "password" in text:
        return "login"
    if "cancel" in text:
        return "cancellation"
    return "needs_review"
This rule is small on purpose. It only checks for pieces of text, so one failure is easy to see.
Now we call the rule once per ticket and collect the results in a list:
rule_predictions = [rule_label(ticket) for ticket in X]
print(rule_predictions)['billing', 'login', 'cancellation', 'needs_review', 'needs_review', 'needs_review']Here, we can see that the first three tickets get a label and the last three go to review. The fourth ticket is about a payment showing up twice. It has none of our three words, so the rule cannot place it.
These two tickets show the rule catching the word charged but missing the same problem in other words.
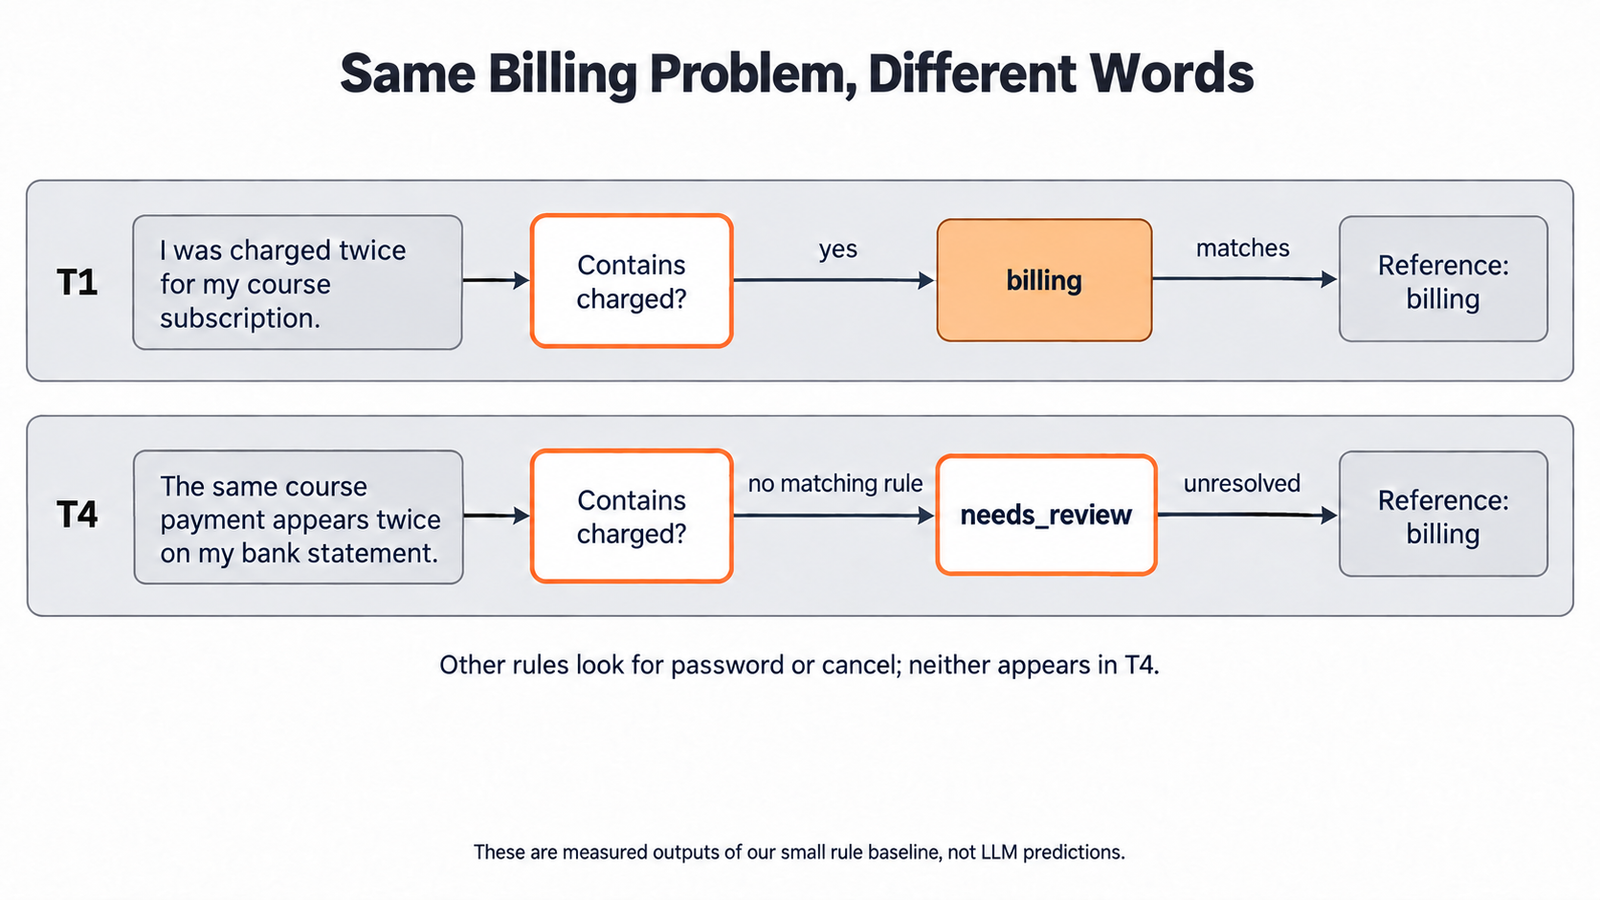
That gives us a clear case to test with a language model. It does not prove that a model will fix it.
Set the Candidate Labels with Scikit-LLM
Before we create the classifier, we tell Scikit-LLM where the model lives. We will use this same setup block in every lesson of the series:
import os

from skllm.config import SKLLMConfig

# Default: Qwen 3.8 27B running on our own machine through Ollama
SKLLMConfig.set_gpt_url("http://localhost:11434/v1")
SKLLMConfig.set_gpt_key("ollama")
MODEL = "custom_url::qwen3.8:27b"

# Option: the free Qwen 3.8 27B on OpenRouter (uncomment these lines)
# SKLLMConfig.set_gpt_url("https://openrouter.ai/api/v1")
# SKLLMConfig.set_gpt_key(os.environ["OPENROUTER_API_KEY"])
# MODEL = "custom_url::qwen/qwen3.8-27b:free"
The active lines point the library at our local Ollama server. "ollama" is only a placeholder key, since Ollama does not check it. The custom_url:: part of MODEL tells Scikit-LLM to send the request to that URL. The commented lines are the hosted option, which Day 2 explains line by line.
Now we import the classifier from its full module path and create it. Creating clf only stores settings. It does not call the model yet.
from skllm.models.gpt.classification.zero_shot import ZeroShotGPTClassifier

clf = ZeroShotGPTClassifier(model=MODEL, default_label="needs_review")
We set default_label on purpose. The library default is "Random", which picks a real label at random when a reply cannot be used. That would hide failures. A visible needs_review marker is much easier to spot. Classifier parameters
Next, we pass the allowed labels. None means we give no training texts to this zero-shot setup. The classes_ attribute shows the stored labels, and the trailing underscore is part of its name.
clf.fit(None, candidate_labels)
print(clf.classes_)['billing', 'login', 'cancellation']Here, we can see our three labels stored in classes_. No model call has happened yet, so this step works even when Ollama is closed.
This fit call stores three candidate labels without changing the language model's weights.
What Happens During predict
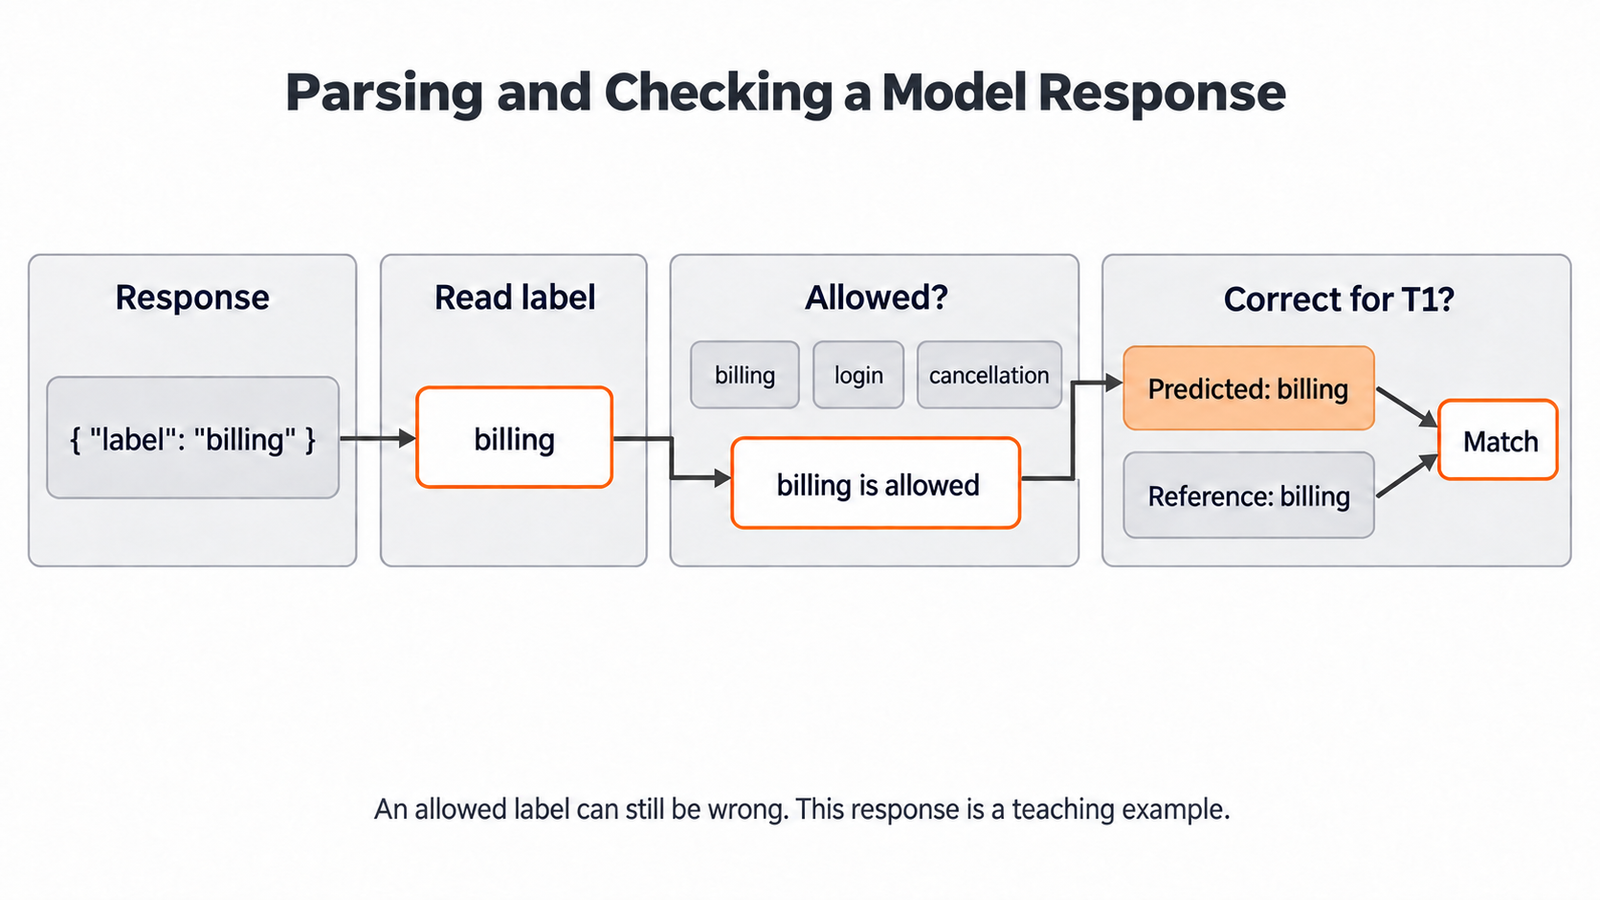
For each ticket, the classifier builds a prompt from the stored labels and the ticket text. The prompt asks the model to answer in JSON with one key, label. The library reads that key and checks that the label is allowed. Then it collects one result per ticket into an array. Classifier implementation
Let's say the reply holds billing in its label field. Reading the reply gets us billing. The allowed-label check then confirms that billing is on our list.
These two checks have different jobs. Reading proves the program understood the reply's shape. The list check proves the label is allowed. Neither proves that billing is the right answer.
Our human reference gives that final check. If the model returned login for the double-charge ticket, it would be allowed and still wrong.
So, we first read the returned label, then check it is allowed, and finally compare it with the human reference.
Classify the Six Tickets with the Local Model
This step calls the model, so Ollama must be running with qwen3.8:27b downloaded. zip() pairs each ticket with its result in order, and the loop prints each pair.
predictions = clf.predict(X)
for ticket, label in zip(X, predictions):
    print(ticket)
    print("Predicted label:", label)
While it runs, Scikit-LLM shows a progress bar for the six tickets. Then each ticket prints with its label. Every label is one of billing, login, cancellation or needs_review. predictions is a NumPy array of shape (6,), one result per ticket.
Note
Qwen 3.8 is a thinking model: it reasons before it answers. Ollama keeps that reasoning out of the text Scikit-LLM reads, so the label stays clean. The thinking does make each call slower, so six tickets can take a while on a modest machine.
Each result sits at the same position as its ticket, so we can compare them pair by pair.
Read Failures Before Trusting Labels
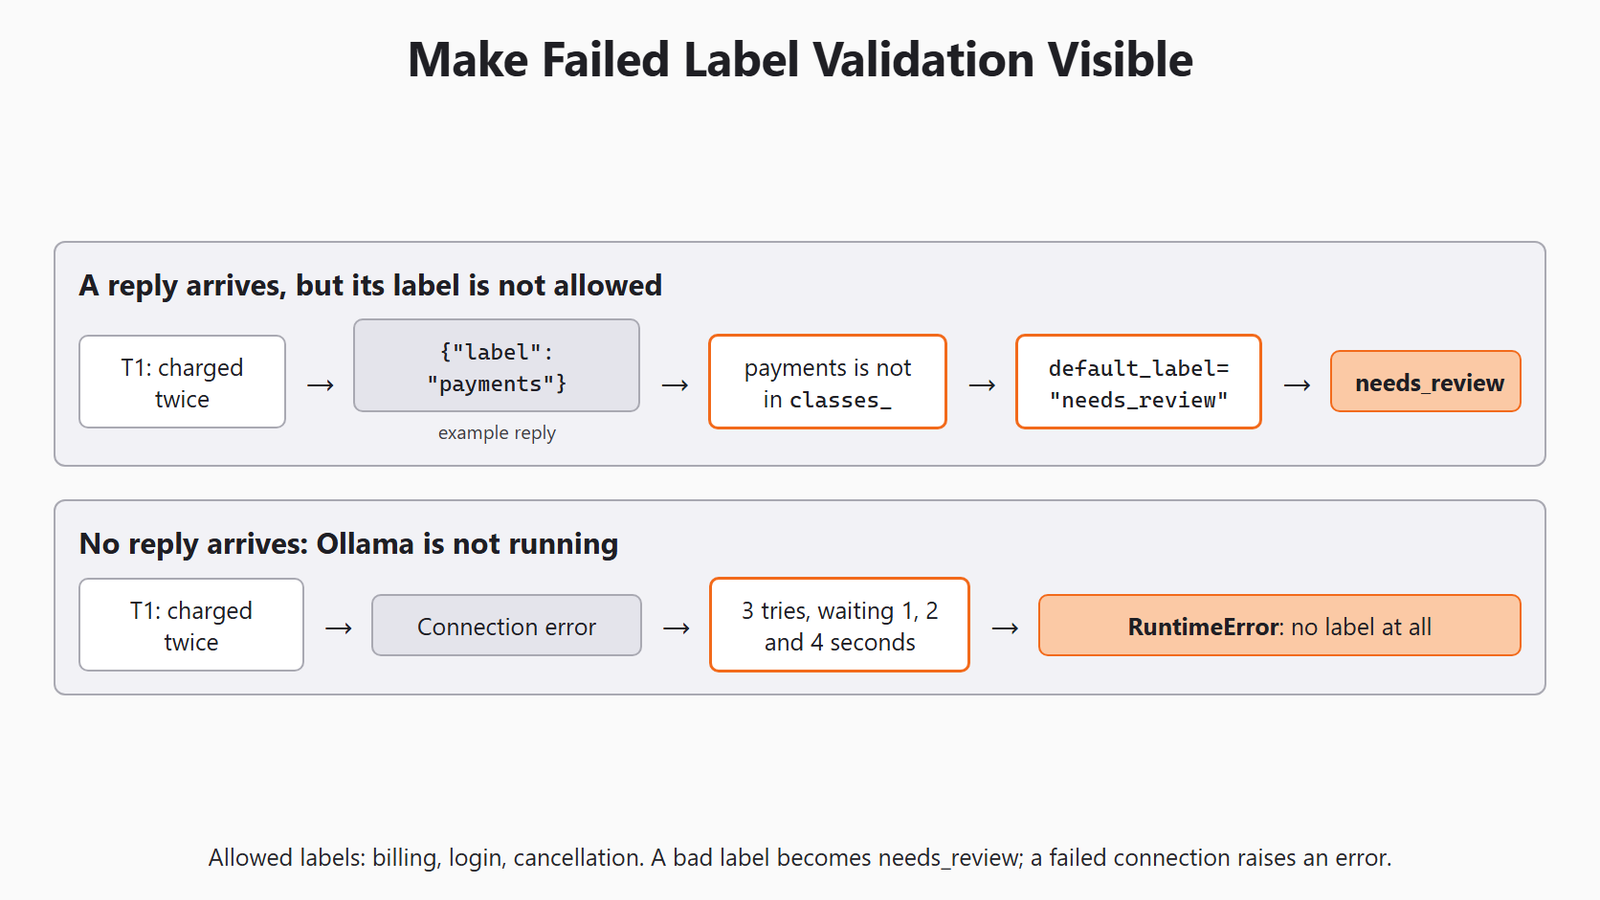
Suppose the model replies with payments, while our allowed label is billing. That label is not in classes_, so the library swaps it for our default_label, needs_review. The same happens to Billing with a capital B, because labels must match exactly.
A connection failure is different. If Ollama is not running, there is no reply to check at all. The library tries the call 3 times, waiting 1, 2 and 4 seconds after each failed try. Then it prints this line and raises a RuntimeError:
Could not complete the operation after 3 retries: `APIConnectionError :: Connection error.`So, an out-of-set label becomes needs_review, while a failed connection raises an error instead.
Warning
A failed call is slow. The OpenAI client that Scikit-LLM uses also retries inside each try. On our Windows PC, with Ollama closed, predict took 49.5 seconds before the RuntimeError appeared. If a prediction hangs, check that Ollama is running first.
An error like this says nothing about label quality. Also, a label can look fine and still be wrong without any fallback. We still need reference answers and a look at each mistake.
Check What We Actually Measured
Accuracy is the share of predictions that match the reference answers. For six tickets, we can count it by hand in code. zip() pairs predictions with answers, pred == ref gives True or False, and sum() counts the True values.
correct = sum(
    pred == ref
    for pred, ref in zip(rule_predictions, y_reference)
)
print(f"Exact matches: {correct}/{len(X)}")
print(f"Accuracy: {correct / len(X):.2f}")Exact matches: 3/6
Accuracy: 0.50Here, we can see 3 matches out of 6, an accuracy of 0.50. A needs_review marker counts as a miss, because it is not the human answer. The :.2f format shows two digits after the decimal point.
We also count how often the rule asks for review. A system can avoid wrong answers by handing work to a person, but it may then leave much of the inbox unsolved.
reviews = rule_predictions.count("needs_review")
print(f"Review rate: {reviews / len(X):.2f}")Review rate: 0.50Here, we can see a review rate of 0.50. The rule solves three of our six tickets and sends three to a person.
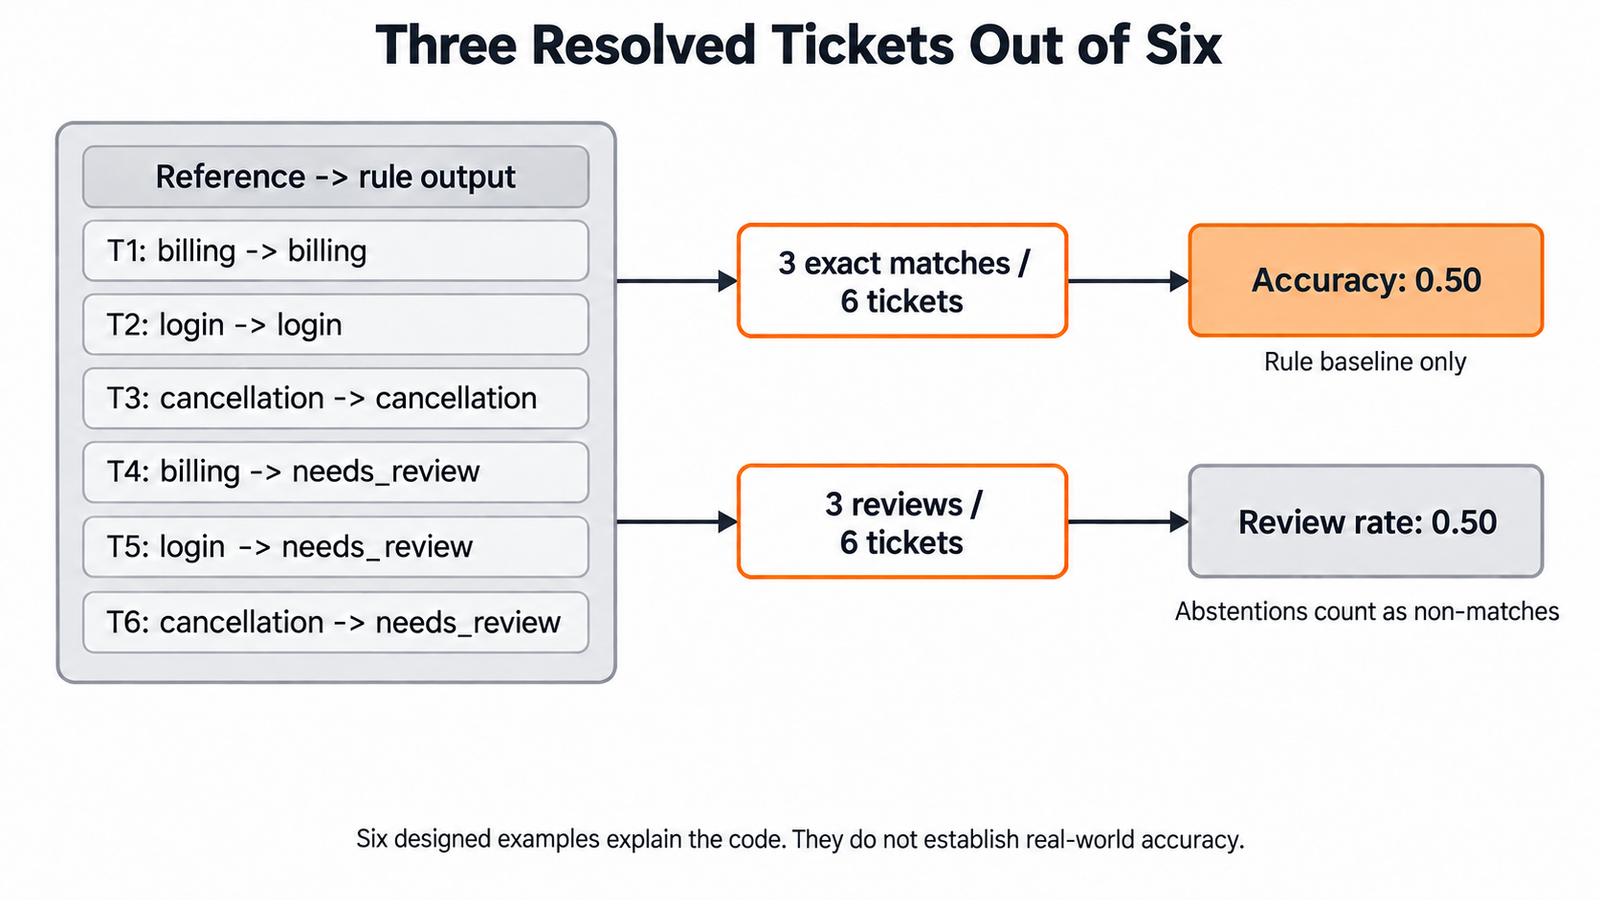
These numbers come from a set we designed: three clear keywords, then three paraphrases. It is a teaching device, not a real inbox, so 50% is not a real-world estimate.
We can score the model's labels with the same check. We only swap in predictions:
llm_correct = sum(
    pred == ref
    for pred, ref in zip(predictions, y_reference)
)
print(f"LLM exact matches: {llm_correct}/{len(X)}")
This prints the model's match count out of 6. Before trusting that number, we read every mismatch one by one. On Day 4, we compare methods properly on tickets kept aside for testing.
Practice with Two New Tickets
First, we write a new billing message that has none of the words charged, password or cancel. We decide its reference label before running anything. Then we send it through rule_label() and through clf.predict().
Next, we try a message that asks both to cancel and to dispute a charge. Our one-label policy now forces a choice. If two people disagree about the right answer, we fix the policy before blaming the model.
Conclusion
This is how Scikit-LLM works. We pointed it at Qwen 3.8 27B running locally in Ollama. We stored three labels with fit(), and predict() asked the model for one label per ticket. Along the way, a tiny keyword rule solved 3 of our 6 tickets and gave us a baseline to compare against.
- Zero-shot classification sends the task and the allowed labels, with no labeled examples.
- This classifier's
fit()only stores labels;predict()makes the model calls. default_label="needs_review"makes a bad reply visible, while a failed connection raisesRuntimeError.- An allowed label can still be wrong, so reference answers and a look at each mistake matter.
Next steps:
- In Day 2, we explain the setup block line by line and switch to the free OpenRouter option.
- For more on running models locally, see the Ollama setup guide.
- For a refresher on learning from labeled examples, see sentiment analysis with scikit-learn.
We now have a classifier wired to a local model, a checked rule baseline, and a simple way to score both.


